
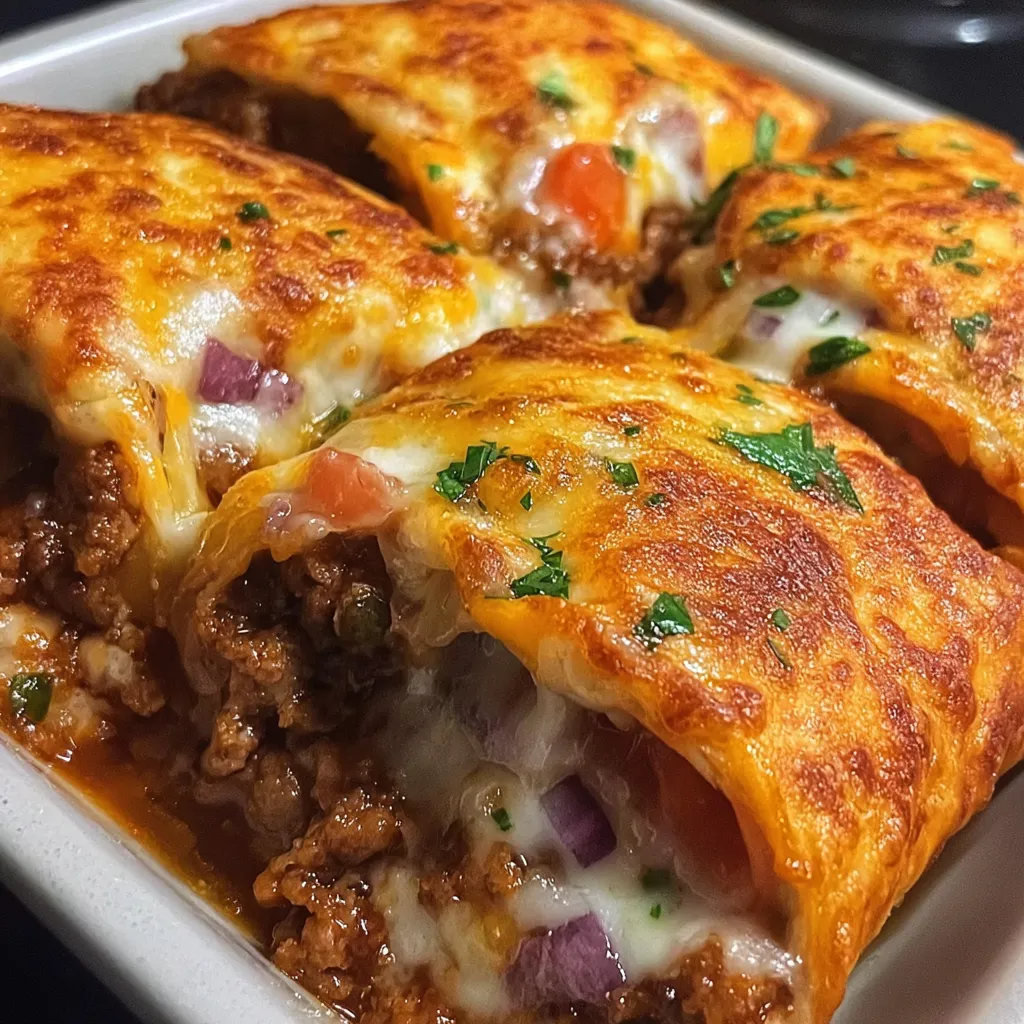
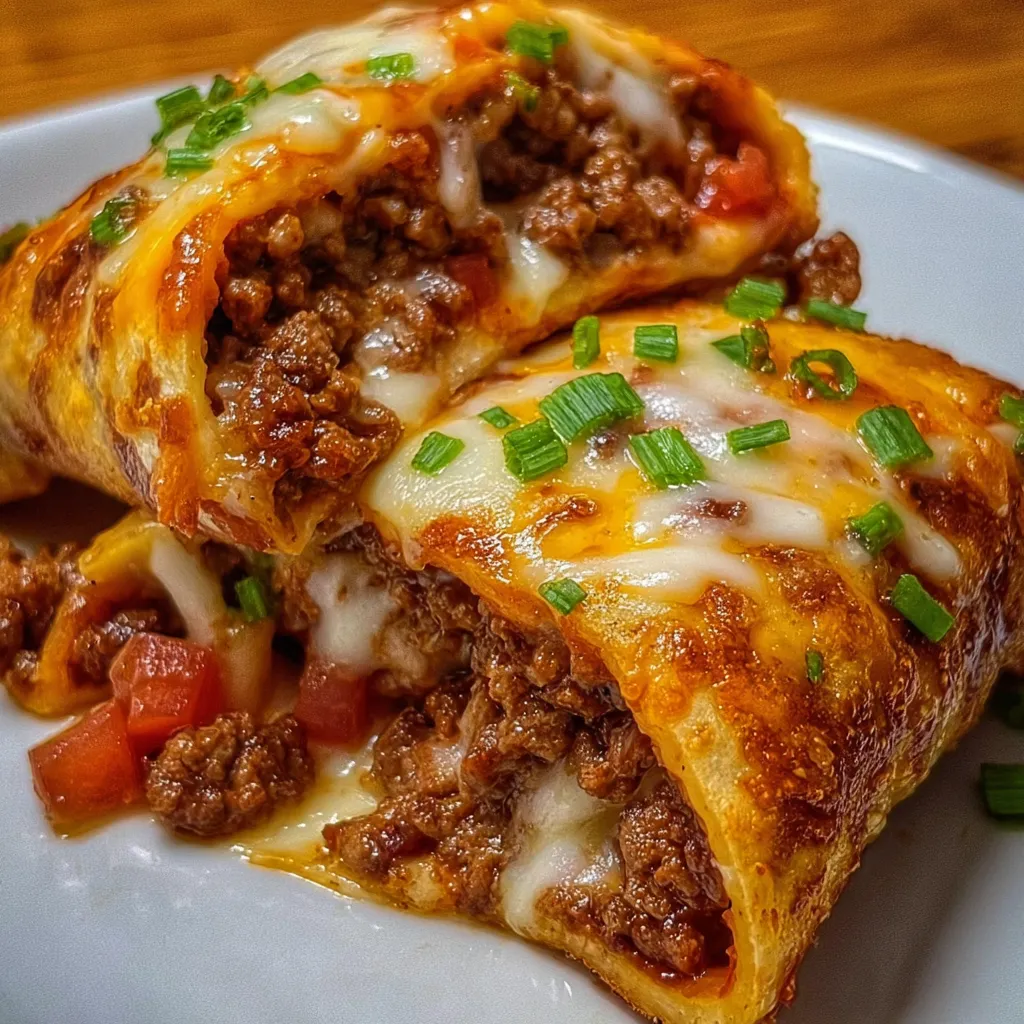
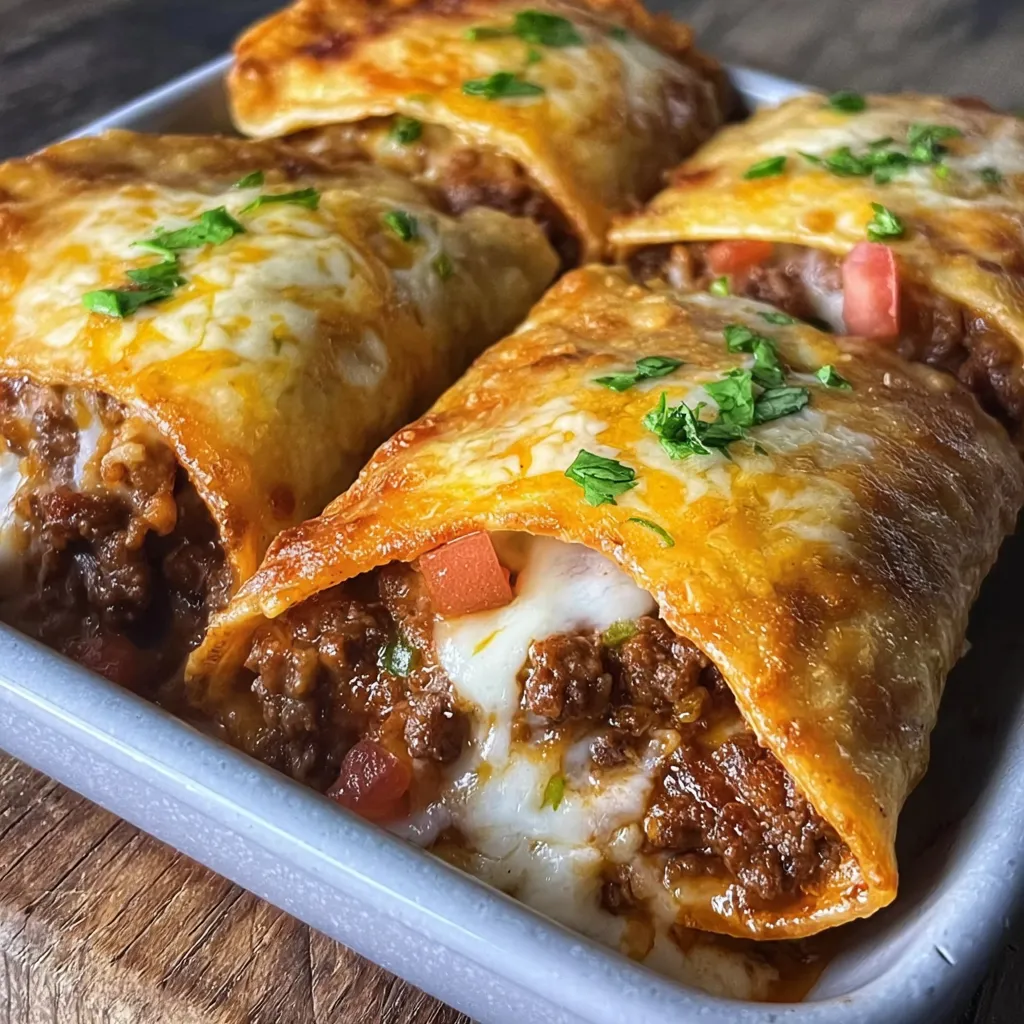
Loaded Cheesy Pocket Tacos are my go-to answer when time is tight but flavor can’t be compromised. As a professional chef who balances high-speed service with a busy home life, I know the value of meals that come together fast without sacrificing heartiness. These crispy-on-the-outside, melty-inside pockets fit perfectly into weeknights, after-school bustle, and big family meals. I build the filling with seasoned beef, cheese, and bright toppings, tuck everything into warm tortillas, and bake until the edges glow golden. They scale for crowds, reheat beautifully, and never fail to impress. Read on to see why this recipe works every time
Table of Contents
what make this Loaded Cheesy Pocket Tacos special
Loaded Cheesy Pocket Tacos are my weeknight hero when time is scarce. They pack flavor you can taste in every crispy bite.
As a busy home cook, I love recipes like Loaded Cheesy Pocket Tacos. They taste bold and fit into minutes.
Quick prep, bold flavor, and make-ahead potential make this recipe ideal for moms and professionals.
Crispy exterior and melty cheese deliver comfort in 30 minutes or less.
The best part? You can make the filling ahead, roll pockets, and bake when guests arrive.
That flexibility is a lifesaver for busy days, car lines, and power-cooking sessions.
Loaded Cheesy Pocket Tacos: a warm, relatable intro
First, let me tell you a tiny kitchen truth. Weeknights can feel like a relay race. I reach for Loaded Cheesy Pocket Tacos because they promise bold flavor without drama. Every bite is a reminder that good food can arrive on time. It feels warm, like a hug from the stove. The kids cheer, and I finally breathe.
Loaded Cheesy Pocket Tacos shine with texture and practicality
Texture comes from the contrast of a crunchy exterior and a gooey center. Practicality shows in simple ingredients, quick assembly, and bake-to-serve timing. Plus, they reheat beautifully, making leftovers feel less, well, leftovers. That combination—flavor, ease, and make-ahead options—keeps weeknights human.
Why You’ll Love This Loaded Cheesy Pocket Tacos
Loaded Cheesy Pocket Tacos are my weeknight rescue when time is tight but flavor can’t skip.
I love how they marry quick prep with bold, comforting taste that moms and pros crave.
They bake to crispy perfection.
They reheat beautifully and stretch to feed a crowd.
No chaos in the kitchen.
Best of all, they invite experimentation, letting you tailor toppings.
Even picky eaters enjoy, and weeknight meals stay simple.
Loaded Cheesy Pocket Tacos deliver fast, comforting flavor
These pockets deliver warmth fast, with a crispy shell and melty center.
The beef filling bursts with taco seasoning and bright toppings that keep everyone satisfied.
In twenty minutes, I trade fatigue for joy at the table.
Cleanup is quick and easy, too.
Ingredients
Loaded Cheesy Pocket Tacos use simple, pantry-friendly ingredients.
I build each component with purpose: beef, cheese, and bright toppings.
They’re ideal for busy families with quick prep and bold flavor.
Crispy shells meet gooey centers in 30 minutes or less.
I love make-ahead options for hosting and weeknights alike.
Exact quantities are printed at the bottom and are printable.
Loaded Cheesy Pocket Tacos: Ingredient List
Here is the precise ingredient lineup I reach for, with easy substitutions.
- 1 lb ground beef
- 1 tbsp olive oil
- 1 small onion, finely chopped
- 2 cloves garlic, minced
- 1 packet taco seasoning
- ½ cup water
- 1½ cups shredded cheddar or Mexican blend cheese
- ½ cup crushed tortilla chips (optional, for extra crunch)
- ¼ cup diced tomatoes
- ¼ cup sliced green onions
- 12 flour tortillas
- Cooking spray or melted butter for brushing
Optional substitutions—gluten-free tortillas, dairy-free cheese options, or adding jalapeños for heat.
Exact quantities printed at bottom.
How to Make Loaded Cheesy Pocket Tacos
Step 1 – Preparing the filling
I heat olive oil in a skillet over medium, starting the filling for Loaded Cheesy Pocket Tacos.
The ground beef hits the pan and begins to brown, breaking apart as it sizzles.
I cook until no pink remains and the beef looks rich and glossy.
I add onion and garlic, sautéing 2–3 minutes until softened.
Then I stir in taco seasoning and ½ cup water, simmering until thick and glossy.
Let the mixture rest a minute so the flavors settle before stuffing the pockets.
I pull the pan from heat and let the filling cool slightly.
If I’m planning ahead, I refrigerate the filling in an airtight container for up to 24 hours.
This rest lets flavors mingle and makes assembly quicker later.
Step 2 – Assembling the pockets
I lay each tortilla flat on a clean surface and place a generous spoonful of beef on one half.
Top with shredded cheese, crushed tortilla chips, diced tomatoes, and sliced green onions.
Fold the tortilla over to form a pocket and press edges gently to seal.
Keep filling modest to avoid leaks and ensure even baking.
Repeat with all tortillas until you have 12 pockets.
Arrange pockets seam-side down on a parchment-lined baking sheet.
Lightly brush the tops with cooking spray or melted butter.
If you’re prepping ahead, cover and refrigerate before baking.
This keeps everything fresh and ready for a quick bake.
Step 3 – Baking until crispy
I preheat the oven to 375°F and line a baking sheet with parchment.
Place pockets seam-side down and brush the tops with cooking spray or melted butter.
Bake for 15–18 minutes, flipping halfway, until golden and crispy.
For extra crispness, bake an extra 1–2 minutes.
Watch the edges; they should be deeply golden and the centers melty.
Let the pockets rest a minute before serving.
Step 4 – Serving and storing tips
ServeLoaded Cheesy Pocket Tacos warm with sour cream, salsa, or guacamole on the side.
Leftovers can live in the fridge for 2–3 days and reheat beautifully.
To reheat, bake at 350°F for 8–10 minutes until crisp.
For make-ahead or freezer options, assemble the pockets and freeze unbaked.
Bake from frozen at 375°F for about 25–28 minutes until hot and golden.
Thawing isn’t required for the freezer method, which makes weeknights a breeze.
Tips for Success
- Plan fillings ahead and refrigerate for quick assembly.
- Pre-portion toppings in prep bowls for speed.
Loaded Cheesy Pocket Tacos tips for busy cooks
Feeling pressed? Keep fillings prepped and toppings organized. I bake in batches on Sundays and rewarm during the week, which saves a ton of time. Remember: small, calm prep moments beat frantic, last-minute chaos. The pockets bake fast, so you can plate and serve before the dinner clock strikes showtime.
Equipment Needed
My go-to weeknight toolkit for Loaded Cheesy Pocket Tacos is small but mighty. I keep these tools within arm’s reach, so assembly stays calm and fast. If you don’t have one gadget, there’s usually a friendly substitute to keep you moving.
- Large skillet (12-inch) or nonstick sauté pan for browning beef
- Baking sheet (rimmed) lined with parchment paper or a silicone mat
- Mixing spoon and spatula for stirring and filling
- Tongs for turning and handling pockets
- Measuring cups and spoons for accurate seasoning
- Oven-safe pastry brush or silicone brush for butter spray
- Optional cooling rack to crisp pockets as they bake
Loaded Cheesy Pocket Tacos essential gear
I rely on a well-loved 12-inch skillet, a sturdy sheet pan, parchment, and a silicone brush. A few simple tools keep the kitchen calm, let the flavors shine, and help me deliver warm pockets to the table fast.
Variations
Loaded Cheesy Pocket Tacos can be tailored to fit your weeknight rhythm and dietary needs. Here are quick swaps you can try with minimal fuss.
- Spice level: add jalapeños, serranos, or a splash of hot sauce to the beef; smoke it with chipotle.
- Cheese options: pepper jack for zing, Monterey Jack for melty comfort, or crumbled queso fresco for a lighter bite.
- Tortilla swaps: use corn tortillas for a traditional taco vibe, or go gluten-free with certified options.
- Protein twists: substitute ground turkey or chicken, or use plant-based crumbles for a veggie-friendly version.
- Texture boosters: mix in extra crushed tortilla chips or toasted corn for crunch in every bite.
- Bright toppings: pico de gallo, avocado slices, or fresh cilantro elevate the finish and color.
Loaded Cheesy Pocket Tacos variations: spice, cheese, and tortilla swaps
In my kitchen, these variations are friendly experiments. For heat, I start with a whisper of jalapeño and build to a confident kick with a dash of chili powder. Cheese becomes a conversation—pepper jack brings spark, while cotija adds a salty snap. Tortilla choices change the game: corn tortillas echo taco night, while gluten-free or whole-wheat options keep it inclusive. I love mixing and matching to please picky eaters and busy schedules alike, without losing the cozy, cozy-cheesy core of Loaded Cheesy Pocket Tacos.
Serving Suggestions
Loaded Cheesy Pocket Tacos deserve a dinner table that feels festive without a full-blown kitchen spectacle. Here are easy serving ideas that keep the flavors front and center. Pair them with bright sides, a refreshing drink, and a neatly plated tray. Perfect for busy families and last-minute gatherings that always stay quick.
Loaded Cheesy Pocket Tacos serving ideas
Here are quick, crowd-pleasing ideas to present and pair your tacos beautifully.
- Bright sides: pico de gallo or a quick corn salad
- Drink: Lime agua fresca or sparkling water with lime
- Presentation: Warm platter, cilantro garnish, lime wedges
- Extra touch: Sour cream, salsa, and guacamole in small bowls
Loaded Cheesy Pocket Tacos: Make-Ahead Hacks
Making Loaded Cheesy Pocket Tacos ahead of time is a busy mom’s best friend.
I batch them on Sundays so weeknights feel calm, not chaotic.
Prep fillings, dice toppings, and roll pockets, then store them for a quick bake later.
For make-ahead assembly, cook the beef and cool it completely.
Chill it in an airtight container for up to 24 hours.
Assemble pockets with a light seal, then refrigerate until you’re ready to bake.
Freezing keeps Loaded Cheesy Pocket Tacos handy without losing texture.
Freeze unbaked pockets on a parchment-lined tray, then bag them.
Bake from frozen at 375°F for 25–28 minutes; no thaw needed.
Make-ahead and freezer-friendly Loaded Cheesy Pocket Tacos tips
A quick tip: prep components ahead for faster weeknights.
I often mix the beef filling and measure toppings on a calm Sunday.
This keeps dinner calm and the table smiling when you’re short on time.
Freeze unbaked pockets or baked ones, depending on your schedule.
Bake from frozen for best texture and juicy centers.
Reheat baked pockets in a hot oven until crisp and gooey inside.
FAQs
FAQ: Can I make these with chicken or turkey?
Yes, Loaded Cheesy Pocket Tacos can feature ground chicken or turkey. Brown the poultry with the onion and garlic until cooked through, then stir in the taco seasoning and water as you would with beef. Keep an eye on moisture; poultry can dry, so a splash of broth helps keep filling juicy. The rest stays the same.
FAQ: Are gluten-free options available?
Absolutely. Use gluten-free tortillas or corn tortillas for Loaded Cheesy Pocket Tacos. Check that taco seasoning and add-ins are gluten-free. If needed, look for certified gluten-free labels and avoid crumbled chips containing gluten. The rest of the recipe remains intact and delicious.
FAQ: How do I reheat leftovers without sogginess?
To keep Loaded Cheesy Pocket Tacos crisp, reheat in a 350–375°F oven for 8–12 minutes. Avoid the microwave, which softens the shell. If you froze pockets, bake from frozen until hot and blistered at the edges. Serve promptly with a fresh dollop of sour cream or salsa.
Loaded Cheesy Pocket Tacos FAQ: Can I bake instead of fry?
Loaded Cheesy Pocket Tacos are built to bake, not fry. Baking at 375°F yields a crispy shell and melted center with less mess. If you insist on a fry-element, you’d risk soggy shells or leaking filling, so I don’t recommend it for this recipe. Stick with baking for best results.
Final Thoughts
Loaded Cheesy Pocket Tacos prove weeknights can taste like a celebration. I love the crispy shell with a melty, cozy center. They fit my busy day and my family’s cravings.
Make-ahead options save me when the clock is ticking. Fill, roll, and bake later for quick weeknights. Leftovers rarely exist here, but if they do, they shine.
Loaded Cheesy Pocket Tacos stay with me long after dinner—the laughter, the leftovers, the calm. If you try them, I promise you’ll taste the care in every bite. I’d love to hear how you tweak them for your crew.
Print
Loaded Cheesy Pocket Tacos: 12 epic, zesty, bold bites.
- Total Time: 30 minutes
- Yield: 12 servings 1x
- Diet: Low Calorie
Description
Loaded Cheesy Pocket Tacos are crispy-on-the-outside, melty-on-the-inside pockets stuffed with seasoned beef, cheese, and fresh toppings for a bold, comforting bite.
Ingredients
- 1 lb ground beef
- 1 tbsp olive oil
- 1 small onion, finely chopped
- 2 cloves garlic, minced
- 1 packet taco seasoning
- ½ cup water
- 1½ cups shredded cheddar or Mexican blend cheese
- ½ cup crushed tortilla chips (optional, for extra crunch)
- ¼ cup diced tomatoes
- ¼ cup sliced green onions
- 12 flour tortillas
- Cooking spray or melted butter for brushing
Instructions
- Preheat oven to 375°F (190°C) and line a baking sheet with parchment paper.
- Heat olive oil in a skillet over medium heat. Add ground beef and cook until browned, breaking it apart as it cooks. Drain excess fat if needed.
- Add onion and garlic and sauté for 2–3 minutes until softened.
- Stir in taco seasoning and water. Simmer for 3–4 minutes until thickened. Remove from heat and let cool slightly.
- Lay tortillas flat. Spoon beef mixture onto one half of each tortilla.
- Top with shredded cheese, crushed tortilla chips (if using), tomatoes, and green onions.
- Fold tortillas over filling to form pockets and press edges gently to seal.
- Place pockets on the baking sheet and lightly brush or spray the tops.
- Bake for 15–18 minutes, flipping halfway, until golden and crispy.
- Serve warm with sour cream, salsa, or guacamole if desired.
Notes
- To make ahead, prepare the filling and assembly, then refrigerate until ready to bake.
- For gluten-free version, use gluten-free tortillas or corn tortillas.
- Adjust spice by adding jalapeños or a dash of hot sauce to the beef filling.
- Leftover pockets can be reheated in the oven for a quick meal.
- Prep Time: 15 minutes
- Cook Time: 15 minutes
- Category: Main Dish
- Method: Baking
- Cuisine: Mexican-inspired
Nutrition
- Serving Size: 1 pocket
- Calories: 330
- Sugar: 3 g
- Sodium: 650 mg
- Fat: 20 g
- Saturated Fat: 9 g
- Unsaturated Fat: 11 g
- Trans Fat: 0 g
- Carbohydrates: 24 g
- Fiber: 2 g
- Protein: 18 g
- Cholesterol: 85 mg
Keywords: Loaded Cheesy Pocket Tacos, cheesy pocket tacos, beef tacos, baked tacos, stuffed tortillas, party tacos, Mexican-inspired, comfort food