
Homemade Healthy Cheez-Its offer a satisfying crunch and rich cheese flavor while keeping calories in check, making them an ideal snack for busy families and health‑conscious snackers alike. By combining shredded cheese, softened butter, a pinch of salt, garlic powder, onion powder, and just enough flour to bind, you create a pliable dough that rolls out thin and bakes to a golden perfection in just minutes. This recipe requires only pantry staples, no special equipment, and yields a batch of snack‑size crackers that can be enjoyed straight from the oven or stored for later cravings. Enjoy it!
Table of Contents
Why You’ll Love This Homemade Healthy Cheez-Its
These crackers capture the nostalgic flavor of store‑bought Cheez‑Its while giving you full control over the ingredients. You avoid unnecessary additives and excess sodium, making them a smarter choice for families who watch their nutrition. The buttery, cheesy aroma that fills your kitchen as they bake is irresistible, turning a simple snack into a comforting experience.
Because the dough is versatile, you can easily tweak the seasonings or add a sprinkle of herbs for a personalized twist. The recipe scales well, so you can produce a small batch for a quick bite or a larger batch for parties and school lunches. Most importantly, the satisfaction of creating a beloved snack from scratch is a rewarding culinary win.
Equipment You’ll Need
- Oven
- Baking sheet
- Parchment paper
- Mixing bowl
- Rolling pin or a sturdy bottle
- Sharp knife or cookie cutter
- Measuring cups and spoons
All of these items are common in most kitchens, and there’s no need for specialty gadgets. A rolling pin helps achieve a uniform thickness, which is key for even baking. If you don’t have a cookie cutter, a sharp knife works just as well for cutting squares or desired shapes.
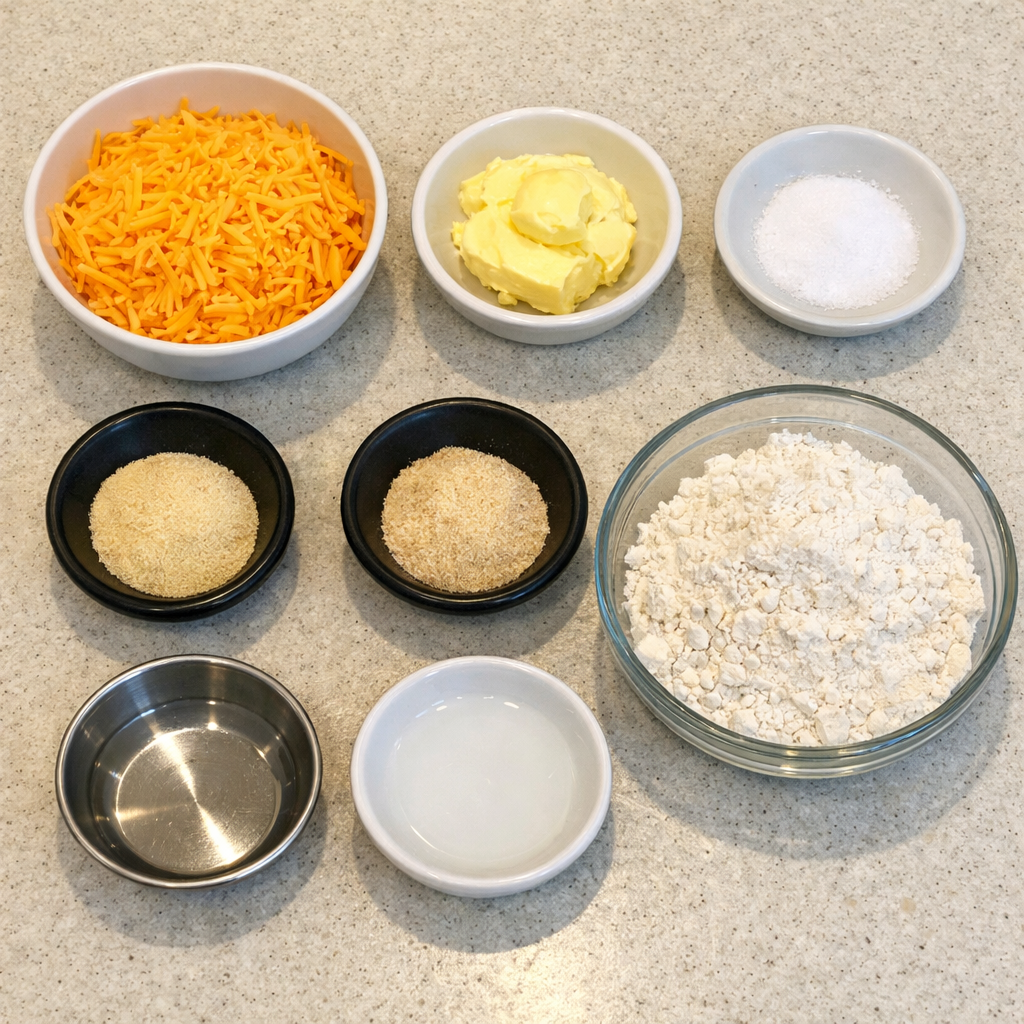
Ingredients for Homemade Healthy Cheez-Its
- 1 cup shredded cheese
- 1/4 cup unsalted butter, softened
- 1/2 teaspoon salt
- 1/4 teaspoon garlic powder
- 1/4 teaspoon onion powder
- 1 cup all‑purpose flour
- 2 tablespoons cold water
Ingredient Substitutions
If you prefer a sharper flavor, substitute part of the shredded cheese with a sharper cheddar. For a dairy‑free version, use a plant‑based cheese and replace butter with a neutral oil, though the texture will change slightly. The recipe is forgiving, so feel free to experiment with low‑sodium cheese to further reduce sodium content.
How to Make Homemade Healthy Cheez-Its (Step‑By‑Step)
Step 1: Preheat the Oven
Set your oven to 350°F (175°C) and line a baking sheet with parchment paper. Preheating ensures the dough bakes evenly and develops that signature golden edge.
Step 2: Combine Wet Ingredients
In a mixing bowl, blend the shredded cheese, softened butter, salt, garlic powder, and onion powder. Stir until the mixture is smooth and the butter is fully incorporated, creating a cohesive base.
Step 3: Incorporate Dry Ingredients
Gradually add the flour to the cheese mixture, stirring with a spatula. When the dough starts to come together, add the cold water one tablespoon at a time, mixing until a firm but pliable dough forms.
Step 4: Roll Out the Dough
Place the dough on a lightly floured surface. Using a rolling pin, roll it to about 1/8 inch thickness. Consistent thickness is essential for uniform crispness.
Step 5: Cut the Shapes
Using a sharp knife or cookie cutter, cut the dough into squares or your preferred shapes. Transfer the cut pieces to the prepared baking sheet, leaving a small gap between each piece.
Step 6: Bake to Perfection
Bake for 10‑12 minutes, watching closely until the edges turn a light golden brown. The crackers will continue to crisp as they cool, so avoid over‑baking.
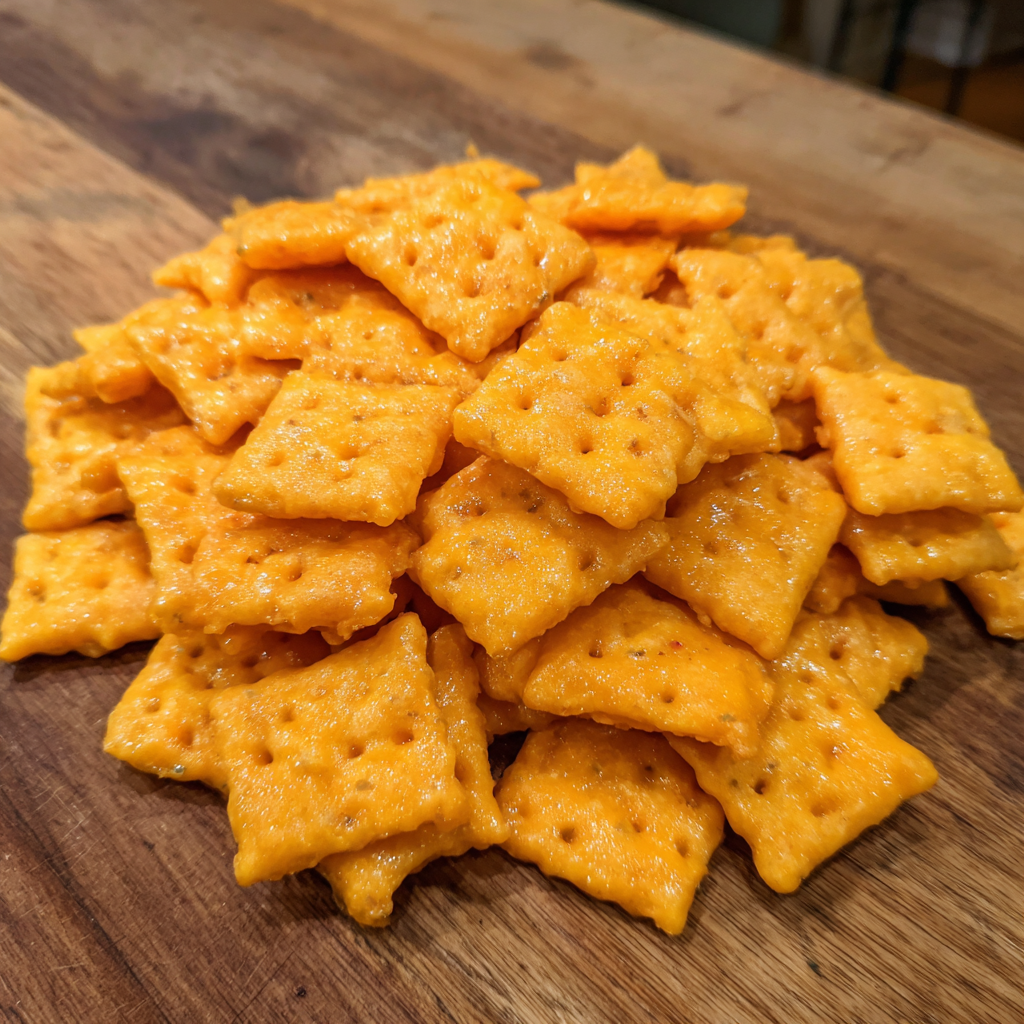
Step 7: Cool and Store
Allow the Cheez‑Its to cool completely on a wire rack. Once cooled, store them in an airtight container to retain crunch for up to a week.
Variations and Twists
For a spicy kick, add a pinch of cayenne pepper or smoked paprika to the dough. If you enjoy herbs, fold in dried oregano or thyme for an aromatic twist. A sweet version can be created by mixing a small amount of honey and swapping half the cheese for a mild cheddar.
What to Serve With Homemade Healthy Cheez-Its
These crackers pair beautifully with a simple tomato dip, hummus, or a light yogurt‑based ranch. For a more substantial snack, serve them alongside sliced turkey prosciutto or a fresh garden salad. A cold glass of grape juice or sparkling water complements the salty‑cheesy flavor nicely.
Pro Tips for Perfect Results
- Chill the dough: Letting the dough rest in the refrigerator for 15 minutes makes it easier to roll and cut.
- Uniform thickness: Use a ruler or the edge of a baking sheet to gauge the dough’s thickness for even baking.
- Don’t overcrowd: Give each piece space on the sheet; overcrowding leads to uneven browning.
- Cool on a rack: This prevents steam from softening the crackers.
- Flavor boost: Sprinkle a tiny pinch of smoked paprika on top before baking for a subtle depth.
Common Mistakes to Avoid
- Adding too much water, which makes the dough sticky and hard to roll.
- Skipping the chill step, resulting in a dough that sticks to the rolling pin.
- Baking at too high a temperature, which can burn the edges before the center crisps.
- Removing the crackers from the sheet while still warm, causing them to lose shape.
- Storing them in a humid environment, which makes them soggy.
Storage, Reheating & Make‑Ahead Tips
Store cooled crackers in an airtight container at room temperature for up to 7 days. For longer storage, freeze them in a zip‑top bag; reheat in a 300°F oven for 5 minutes to restore crispness. Making a large batch on a weekend allows you to have ready‑to‑eat snacks for the entire week, perfect for quick lunchboxes or after‑school treats.
Frequently Asked Questions
Can I use a different cheese? Yes, cheddar, mozzarella, or a blend works well; just keep the total volume at 1 cup.
Do I need to refrigerate the dough? A brief chill (15‑20 minutes) improves handling, but it’s not mandatory.
How long do they stay crispy? Properly sealed, they stay crisp for about a week; exposure to air will soften them.
Conclusion
Homemade Healthy Cheez‑Its give you the classic snack experience with a lighter ingredient list, customizable flavors, and the pride of making it yourself. Whether you’re packing lunches, hosting a game night, or just craving a quick bite, this recipe delivers flavor, texture, and convenience in every bite.
Print
Homemade Healthy Cheez-Its: Easy 4-Serving Snack Recipe for Kids
- Total Time: 27 minutes
- Yield: 4 servings 1x
- Diet: Vegetarian
Description
Discover the ultimate homemade snack with our Healthy Cheez-Its recipe, perfect for families seeking a crunchy, cheesy bite without excess fat. This easy-to-follow guide walks you through mixing shredded cheese, butter, and simple seasonings, then shaping a tender dough into bite‑size crackers. Bake until golden for a snack that rivals store‑bought versions in flavor and texture, while delivering lower calories and wholesome ingredients for guilt‑free munching. Serve warm with a simple tomato di
Ingredients
- 1 cup shredded cheese
- 1/4 cup unsalted butter, softened
- 1/2 teaspoon salt
- 1/4 teaspoon garlic powder
- 1/4 teaspoon onion powder
- 1 cup all-purpose flour
- 2 tablespoons cold water
Instructions
- 1. Preheat oven to 350°F (175°C) and line a baking sheet with parchment paper.
- 2. In a bowl combine shredded cheese, softened butter, salt, garlic powder, and onion powder; mix until smooth.
- 3. Gradually add flour, stirring until a dough forms. Add cold water one tablespoon at a time if needed.
- 4. Roll dough on a floured surface to about 1/8 inch thick.
- 5. Cut into squares or desired shapes and place on the prepared sheet.
- 6. Bake 10‑12 minutes until golden. Cool completely before serving.
Notes
- For extra crispness
- chill the dough 15 minutes before rolling. Store in an airtight container at room temperature for up to 7 days or freeze for longer storage.
- Prep Time: 15 minutes
- Cook Time: 12 minutes
- Category: Snack
- Method: Baking
- Cuisine: American
Nutrition
- Serving Size: 1 cracker
- Calories: 150
- Sugar: 1g
- Sodium: 200mg
- Fat: 8g
- Saturated Fat: 5g
- Unsaturated Fat: 3g
- Trans Fat: 0g
- Carbohydrates: 12g
- Fiber: 0g
- Protein: 6g
- Cholesterol: 30mg
Keywords: Homemade Healthy Cheez-Its, easy cheese cracker recipe, homemade cheese snacks, low calorie cheese crackers, quick snack ideas, bake cheese crackers, cheese cracker dough, snack for kids, cheese cracker storage