
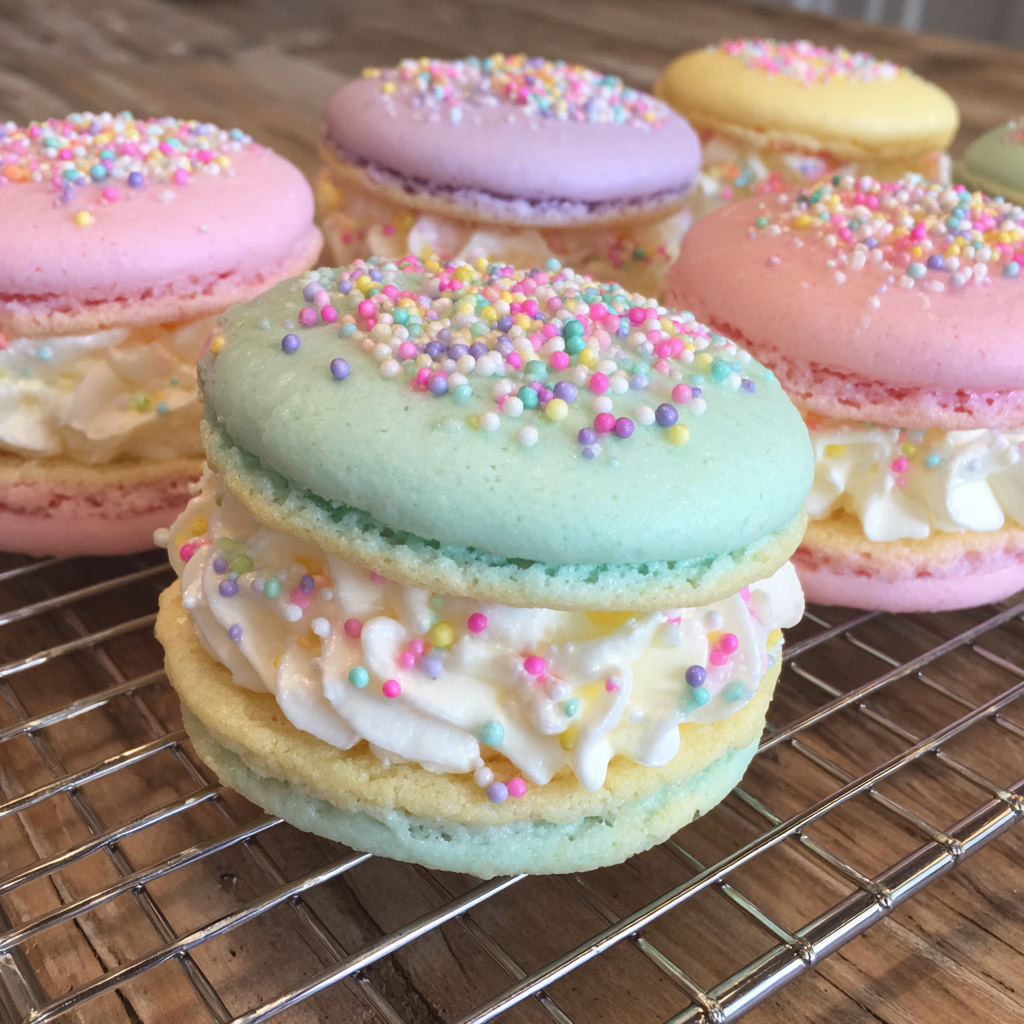
Pastel Sugar Cookie Sandwiches bring a burst of springtime joy to any celebration, combining tender pastel‑colored cookies with a cloud‑like vanilla buttercream that feels like a sweet hug. Imagine a delicate, buttery cookie tinted in soft pink, lavender, mint or sky blue, each bite delivering a melt‑in‑your‑mouth texture and a subtle vanilla aroma. These sandwich cookies are perfect for Easter brunches, birthday parties, or a fun family baking activity where kids can help tint the dough and decorate the tops with sprinkles. With simple pantry staples you’ll create a treat that impresses crowd.
Table of Contents
Why You’ll Love This Pastel Sugar Cookie Sandwiches
There is something magical about pastel colors that instantly evokes feelings of celebration, renewal, and joy. When those colors are paired with a classic sugar cookie, the result is a dessert that feels both nostalgic and fresh. The soft, buttery crumb of each cookie provides a perfect canvas for the vanilla buttercream, allowing the flavors to shine without overwhelming sweetness. Because the cookies are relatively thin, they sandwich together easily, creating a tidy, bite‑size package that is both fun to eat and easy to share.
Beyond aesthetics, these cookies are incredibly versatile. You can scale the recipe up for a large gathering or down for a small family treat. The dough can be tinted in any hue you desire, making it simple to match a party’s color scheme—whether you’re aiming for a pastel rainbow or a single‑tone monochrome look. The buttercream filling can also be flavored further with citrus zest, almond extract, or a hint of peppermint, allowing you to customize the taste profile without adding complexity.
Equipment You’ll Need
While the ingredient list is simple, having the right tools will make the process smoother and ensure consistent results. Below is a checklist of equipment that will help you move from raw dough to polished pastel sandwich cookies with confidence.
- Stand mixer or hand mixer – for creaming butter and sugar to a light, fluffy texture.
- Mixing bowls – a set of various sizes for dry and wet ingredients.
- Measuring cups and spoons – accurate measurement is key for texture.
- Silicone spatula – for scraping batter from the bowl.
- Rolling pin or dough press – optional, but helpful for uniform thickness.
- Cookie scoop or tablespoon – to portion dough evenly.
- Parchment paper – prevents sticking and promotes even baking.
- Wire rack – for cooling cookies completely before filling.
- Food‑grade gel food coloring – choose pastel shades for a soft palette.
- Pastry bag or zip‑top bag with a small cut corner – for piping buttercream.
Ingredients for Pastel Sugar Cookie Sandwiches
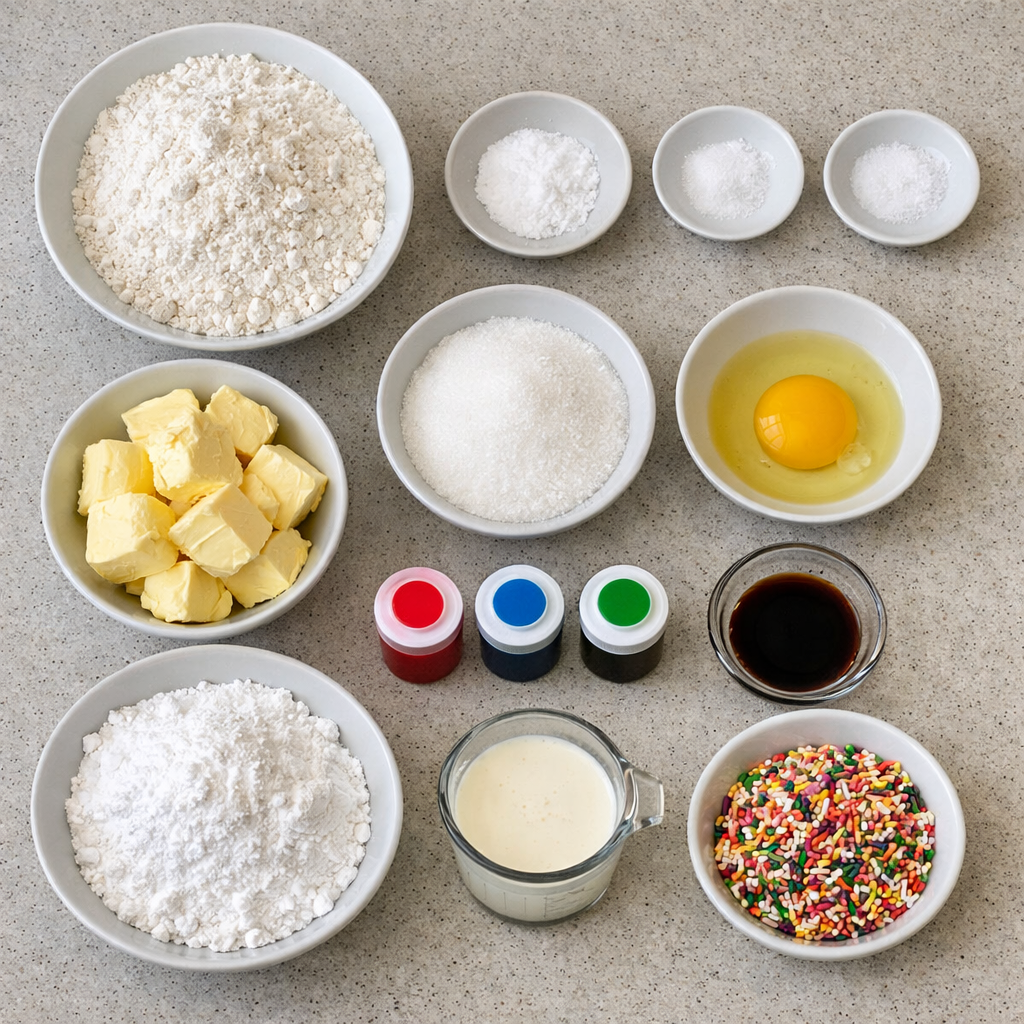
The following ingredients create a balanced cookie that is tender, flavorful, and holds its shape after baking. All ingredients are pantry staples, making this recipe accessible for most home bakers.
- 2 ¾ cups all‑purpose flour
- 1 teaspoon baking soda
- ½ teaspoon salt
- 1 cup unsalted butter, softened
- 1 ½ cups granulated sugar
- 1 large egg
- 1 teaspoon vanilla extract
- Gel food coloring (pastel pink, lavender, mint, sky blue, etc.)
- 2 cups powdered sugar
- ¼ cup heavy cream
- Sprinkles (optional, for decorating the edges)
Ingredient Substitutions
If you need to adjust the recipe for dietary preferences, you can substitute the butter with a high‑fat margarine, and use a plant‑based milk mixed with a splash of lemon juice in place of heavy cream for a lighter filling. However, keep in mind that these swaps may slightly alter texture and flavor.
How to Make Pastel Sugar Cookie Sandwiches (Step‑By‑Step)
Step 1: Preheat the Oven
Set your oven to 350°F (175°C). Position a rack in the middle of the oven and line two baking sheets with parchment paper. Preheating ensures even heat distribution, which is crucial for achieving uniformly baked cookies.
Step 2: Combine Dry Ingredients
In a medium bowl, whisk together the flour, baking soda, and salt. Whisking aerates the mixture, helping to prevent clumps and ensuring a consistent rise.
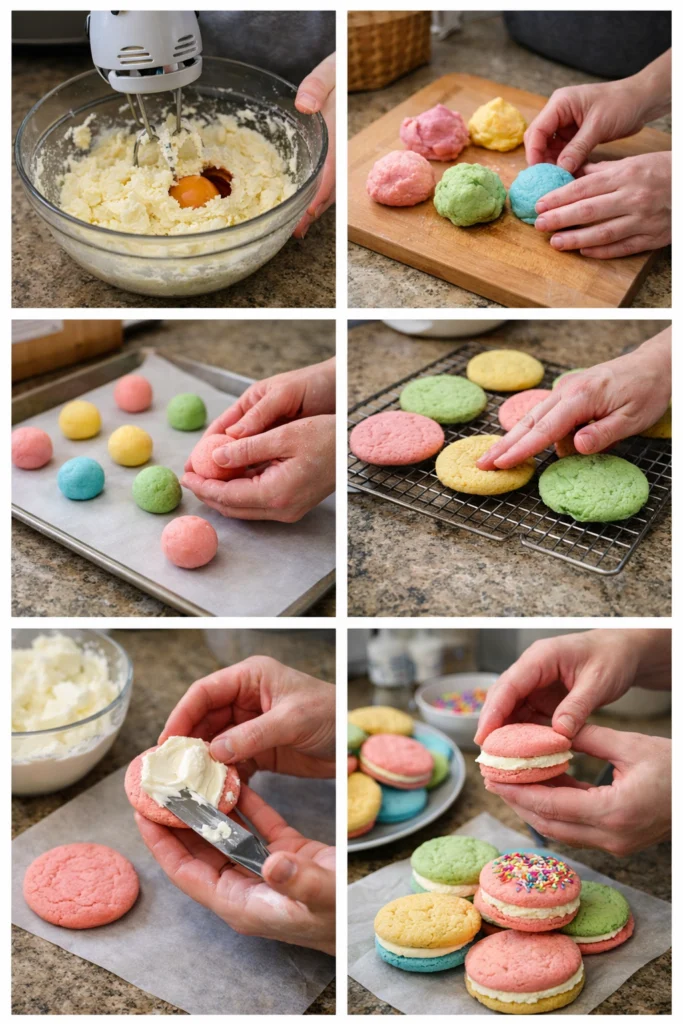
Step 3: Cream Butter and Sugar
Using a stand mixer on medium speed, beat the softened butter and granulated sugar together until the mixture is light in color and fluffy in texture, about 3‑4 minutes. This step incorporates air, giving the cookies a tender crumb.
Step 4: Add Egg and Vanilla
Crack the egg into the butter‑sugar mixture, then add the vanilla extract. Mix until fully combined, scraping the sides of the bowl as needed.
Step 5: Incorporate Dry Ingredients
Gradually add the flour mixture to the wet ingredients, mixing on low speed just until no streaks of flour remain. Over‑mixing can develop gluten, resulting in a tougher cookie.
Step 6: Divide and Tint the Dough
Turn the dough out onto a lightly floured surface and split it into four equal portions. Add a few drops of gel food coloring to each portion, kneading gently until the color is evenly distributed. For a pastel effect, use a small amount of color and consider adding a touch of white frosting dye if needed.
Step 7: Shape the Cookies
Using a cookie scoop or tablespoon, portion out balls of dough roughly one inch in diameter. Place the balls on the prepared parchment, spacing them about two inches apart. Gently flatten each ball with the bottom of a glass or your palm to create a uniform thickness of about ¼ inch.
Step 8: Bake
Slide the sheets into the preheated oven and bake for 8‑10 minutes, or until the edges are just lightly golden. The centers should remain soft; they will firm up as they cool.
Step 9: Cool
Remove the cookies from the oven and allow them to rest on the baking sheet for 2 minutes before transferring to a wire rack. Cooling completely prevents the buttercream from melting when assembled.
Step 10: Prepare the Buttercream Filling
In a clean bowl, whisk together the powdered sugar and heavy cream until the mixture is smooth and fluffy. Add a pinch of salt if desired to balance sweetness. For extra flavor, stir in a dash of additional vanilla extract.
Step 11: Assemble the Sandwiches
Match cookies of similar size and color. Using a piping bag or a small spoon, spread a generous layer of buttercream on the flat side of one cookie, then top with its partner, pressing lightly to spread the filling evenly to the edges.
Step 12: Optional Sprinkles
If you like a bit of sparkle, roll the edges of the assembled sandwiches in sprinkles while the buttercream is still soft. This adds a playful texture and visual pop.
Step 13: Store or Serve
Arrange the finished sandwiches on a platter or store them in an airtight container. They keep well at room temperature for up to three days, or you can freeze them for longer storage.
Variations and Twists
While the classic version shines on its own, there are countless ways to personalize these pastel treats. Swap the vanilla buttercream for a lemon‑zest frosting for a bright, tangy contrast. Add a teaspoon of cocoa powder to the dough for a chocolate‑marbled pastel look, then tint with pastel colors for a fun surprise. For a holiday twist, incorporate finely chopped candied citrus peel into the buttercream or sprinkle toasted coconut on the cookie edges. If you want a richer filling, fold in a tablespoon of softened cream cheese into the buttercream for a cheesecake‑like texture.
What to Serve With Pastel Sugar Cookie Sandwiches
These cookies pair beautifully with a variety of beverages and side dishes. A light, chilled sparkling grape juice complements the sweetness without overpowering it. For a more indulgent experience, serve them alongside a scoop of vanilla ice cream or a dollop of fresh whipped cream. If you’re planning a brunch, consider a fruit salad of berries and mint, which adds a refreshing contrast to the buttery cookies. For a savory balance, a mild cheese platter featuring brie or goat cheese works surprisingly well, especially when paired with a crisp cucumber water.
Pro Tips for Perfect Results
- Use room‑temperature butter. Softened butter creams more easily, creating a lighter texture.
- Do not over‑mix the dough after adding flour; stop as soon as the ingredients are just combined.
- Chill the dough for 15‑20 minutes if it feels sticky before portioning. This prevents spreading.
- When tinting, start with a tiny amount of gel color. Pastel shades are achieved with less pigment, and you can always add more.
- For uniform thickness, use a cookie press or a rolling pin with guides set to ¼‑inch depth.
- Allow cookies to cool completely before filling; residual heat can melt the buttercream and cause slipping.
- If the buttercream is too soft to pipe, refrigerate it for 10 minutes before assembling.
- Store assembled cookies in a single layer with parchment between layers to avoid sticking.
Common Mistakes to Avoid
- Over‑baking: Baking beyond 10 minutes can dry out the cookies, making them crumbly.
- Using too much food coloring: Intense colors can become harsh and detract from the pastel aesthetic.
- Skipping the chill step: Warm dough spreads too much, resulting in thin, uneven cookies.
- Not measuring flour correctly: Spoon and level the flour; packing it leads to dense cookies.
- Filling the sandwiches while the buttercream is too warm: This can cause the filling to seep out.
Storage, Reheating & Make‑Ahead Tips
For short‑term storage, place the finished sandwiches in an airtight container at room temperature. A layer of parchment paper between each layer prevents them from sticking together. They stay fresh for up to three days. To extend shelf life, freeze the assembled cookies in a single‑layer tray, then transfer to a zip‑top freezer bag. When ready to enjoy, let them thaw at room temperature for 30 minutes; the buttercream will soften back to its ideal consistency.
If you prefer to prep ahead, bake the cookies up to a week in advance and store them separately from the buttercream. Assemble the sandwiches the day you plan to serve them for maximum freshness.
Frequently Asked Questions
Can I use a different type of flour? Yes, you can substitute half of the all‑purpose flour with cake flour for an even more tender crumb.
How do I achieve a truly pastel shade? Use a very small amount of gel food coloring and add a touch of white frosting dye if needed. Mix thoroughly to avoid streaks.
Are these cookies gluten‑free? Replace the all‑purpose flour with a 1‑to‑1 gluten‑free flour blend. The texture may be slightly different but still delicious.
Can I make the buttercream ahead of time? Absolutely. Store the buttercream in the refrigerator for up to a week; bring to room temperature and re‑whip before using.

Conclusion
Pastel Sugar Cookie Sandwiches combine visual charm with classic buttery flavor, making them an unforgettable addition to any spring gathering. Whether you’re baking with children, preparing treats for a holiday party, or simply craving a colorful snack, this recipe offers the perfect balance of ease and elegance. Follow the steps, experiment with variations, and enjoy the smiles that these pastel delights bring to every table.
Print
Pastel Sugar Cookie Sandwiches: Easy Spring Dessert Recipe for Easter and Parties
- Total Time: 30 minutes
- Yield: 24 cookie sandwiches 1x
- Diet: Vegetarian
Description
Pastel Sugar Cookie Sandwiches are a spring dessert featuring soft pasteltinted sugar cookies sandwiched with light vanilla buttercream.Each bite offers a melt‑in‑the‑mouth texture, a subtle vanilla flavor, and a pop of color that makes them perfect for Easter gatherings and birthday parties too.The recipe uses simple pantry staples—flour, butter, sugar, egg, vanilla—and can be easily scaled for larger crowds or small batches, delivering an Instagram‑worthy treat that looks as good as it tastes!
Ingredients
- 2 ¾ cups all‑purpose flour
- 1 teaspoon baking soda
- ½ teaspoon salt
- 1 cup unsalted butter, softened
- 1 ½ cups granulated sugar
- 1 large egg
- 1 teaspoon vanilla extract
- Gel food coloring (pastel pink, lavender, mint, sky blue, etc.)
- 2 cups powdered sugar
- ¼ cup heavy cream
- Sprinkles (optional)
Instructions
- Preheat oven to 350°F (175°C) and line baking sheets.
- Whisk flour, baking soda, and salt.
- Cream butter and sugar until fluffy; add egg and vanilla.
- Gradually mix in dry ingredients.
- Divide dough, tint with gel colors, and shape into balls.
- Flatten balls, bake 8‑10 minutes, then cool.
- Beat powdered sugar and heavy cream for buttercream.
- Pipe buttercream between matching cookies.
- Optional: roll edges in sprinkles.
- Store in airtight container.
Notes
- For a smoother buttercream
- chill it briefly before piping. If dough feels sticky
- chill for 15 minutes before scooping.
- Prep Time: 20 minutes
- Cook Time: 10 minutes
- Category: Dessert
- Method: Baking
- Cuisine: American
Nutrition
- Serving Size: 2 cookies
- Calories: 120
- Sugar: 12g
- Sodium: 80mg
- Fat: 6g
- Saturated Fat: 3g
- Unsaturated Fat: 2g
- Trans Fat: 0g
- Carbohydrates: 16g
- Fiber: 0g
- Protein: 1g
- Cholesterol: 20mg
Keywords: Pastel Sugar Cookie Sandwiches, easy sugar cookie recipe, pastel cookies, spring desserts, cookie sandwich ideas, vanilla buttercream frosting, Easter cookie recipes, kid friendly baking, colorful cookie sandwich