
Cheesy Taco Sticks are born from a pro chef’s rhythm of busy days and big flavor, a snack born to travel from kitchen to table in minutes.
On my about page, I share that cooking should be efficient, restaurant-quality without the fuss, and designed for real life.
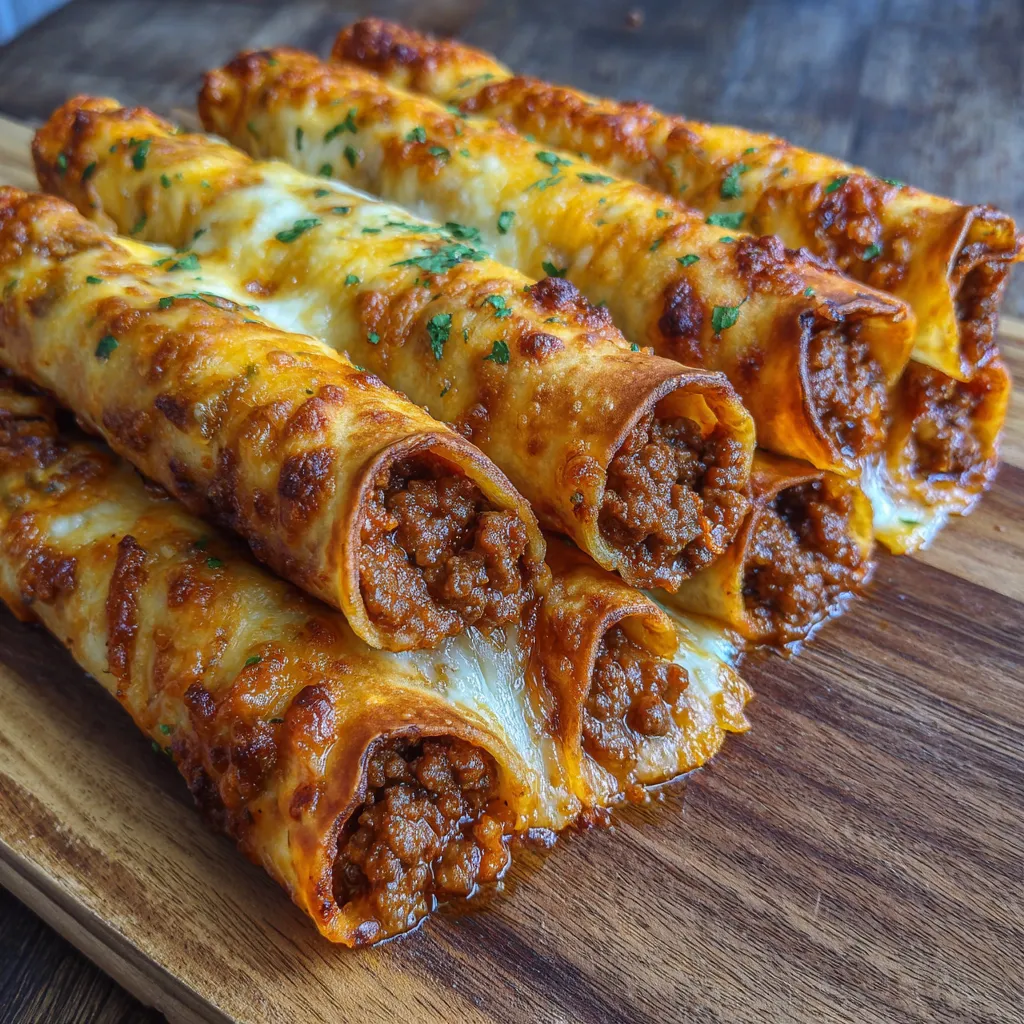
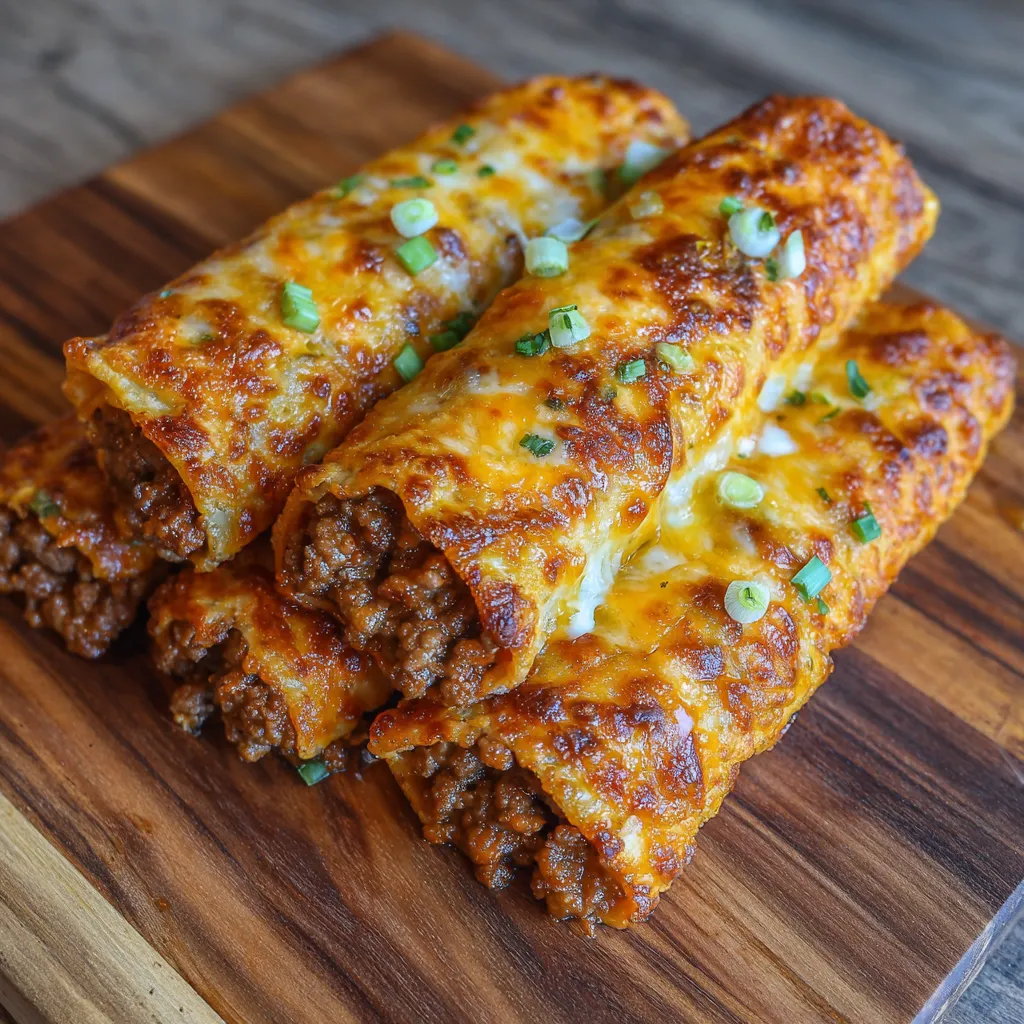
These Cheesy Taco Sticks fuse seasoned beef, melty cheese, and a crisp crust into 30-minute magic—perfect for busy moms, professionals, and anyone who wants a crowd-pleasing bite without the drama.
Read on to see how this recipe keeps weeknights simple, and entertaining easy, with practical tips, make-ahead options, and dips that elevate every bite.
Let’s dive into a kitchen-tested favorite that scales to any gathering, from quick weeknights to game-day spreads.
I’ll share dips, substitutions, and a few humble tricks I use to keep this recipe friendly for real life.
From pantry to plate, these bites pack flavor without fuss, making weeknights feel like a win.
The kid-friendly format invites little hands to help and big appetites to smile.
If you love easy, crowd-pleasing snacks, this recipe is your new go-to for entertaining and everyday meals.
Table of Contents
what make this Cheesy Taco Sticks special
Cheesy Taco Sticks are my go-to solution when the clock is ticking. They fit a busy woman’s life by marrying familiar flavors with hands-free prep.
A shared, savory snack, they travel from stove to table in minutes. Kids love the taco bites vibe, and I adore the mess-free dipping setup. If I’m short on time, these bites turn weeknights into a celebration. They’re crisp, cheesy, and shareable, a comforting aroma that says, dinner is easy.
I multiply the batch for company, then stash the rest for another busy night. That simple routine keeps meals joyful, not frantic. Trust me, friend.
A Warm Welcome to Cheesy Taco Sticks
Welcome to my kitchen, where flavor meets function.
Why You’ll Love This Cheesy Taco Sticks
Cheesy Taco Sticks turn busy days into tasty wins.
I reach for them when time is tight and cravings are loud.
They taste handheld.
Benefits for Busy Lifestyles
Ease is the selling point.
These bites pull dinner in minutes, forgiving leftovers,
and they store for nights.
Crowd-Pleasing Flavor in a Handheld Form
Packed with taco beef and melty cheese, they vanish at parties.
Weeknights become easier with a handheld crowd-pleaser.
Kids love dipping, and adults cheer the no-fuss setup anywhere.
Ingredients
Here’s the lineup for Cheesy Taco Sticks. Each ingredient supports crisp, cheesy flavor in minutes.
- 1 lb ground beef — the savory filling that browns into tiny crumbles.
- 1 tbsp olive oil — helps the beef brown and stay moist.
- 1 packet taco seasoning — brings bold, familiar taco flavor.
- ½ cup water — simmering liquid to thicken the beef mix.
- 1½ cups shredded cheddar or Mexican blend cheese — melts into gooey pockets.
- 1 tube refrigerated pizza dough — forms the golden crust around the filling.
- 2 tbsp melted butter — adds shine and a toasty finish.
- ½ tsp garlic powder — subtle allium warmth.
- ½ tsp dried parsley — a fresh-looking finish on top.
Exact quantities are listed at the bottom of the article and are printable for your convenience.
Ingredient Overview for Cheesy Taco Sticks
I keep these basics on hand for quick prep. Ground beef and cheese drive the flavor, while dough keeps it kid-friendly.
Quick Notes on Substitutions
- Use pepper jack or Monterey Jack for a spicier kick.
- Swap in crescent roll dough if you don’t have pizza dough.
- Try turkey or plant-based crumble for a lighter option.
- For dairy-free, use vegan cheese and olive oil for brushing.
How to Make Cheesy Taco Sticks
Steps for Cheesy Taco Sticks
Here’s the straightforward, no-fuss plan to make Cheesy Taco Sticks shine. I keep the steps simple so you can prep, bake, and dip without drama. Read through, and you’ll see how fast this crowd-pleaser comes together.
Step 1 : Preheat the Oven
Preheat to 400°F (205°C) and line a sheet with parchment. This helps the crust crisp and sticks release cleanly.
Step 2 : Cook the Beef
Heat olive oil in a skillet over medium. Add ground beef; cook until browned and crumbly.
Step 3 : Add Taco Seasoning and Simmer
Stir in taco seasoning and ½ cup water. Simmer 3–4 minutes until thickened; cool slightly.
Step 4 : Roll Dough
Roll pizza dough into a rectangle. Cut into 10 equal strips.
Step 5 : Fill and Seal
Spoon beef down the center of each strip. Top with shredded cheese, then fold and seal.
Step 6 : Arrange Cheesy Taco Sticks on the Sheet
Place sticks seam-side down on parchment. Leave space so they bake crisp.
Step 7 : Brush with Butter and Season Cheesy Taco Sticks
Brush with melted butter. Sprinkle garlic powder and dried parsley for color and aroma.
Step 8 : Bake Cheesy Taco Sticks to Golden Crisp
Bake 12–15 minutes until golden brown and bubbling with cheese.
Step 9 : Rest and Serve
Let them rest five minutes before serving. They stay moist inside and crisp outside.
Optional Dipping and Tweaks Cheesy Taco Sticks
Offer salsa, sour cream, or guacamole for dipping. Swap in pepper jack for heat if you like.

Tips for Success
Practical Quick-Hit Tips
- I keep dough cold; chill my hands as I work.
- I pre-measure spices, setting up one taco seasoning packet.
- I cut dough into strips ahead—use a bench scraper.
- I seal edges well, pressing firmly.
- I bake on the middle rack for even browning.
Make-Ahead and Storage Tips
- I assemble sticks up to sealing and refrigerate briefly to help seal.
- I freeze unbaked sticks on a sheet, then bag; bake from frozen.
- I reheat the filling ahead and warm before filling.
Equipment Needed
- Rimmed baking sheet
- Parchment paper or silicone mat
- Skillet and mixing bowl
- Sharp knife and cutting board
- Rolling pin or sturdy substitute
- Pastry brush or spoon
- Measuring spoons and cups
- Oven mitts
Essential Tools for Cheesy Taco Sticks
These basics cover bake, seal, and serve.
Handy Substitutes
No parchment? Use a silicone mat. No rolling pin? Try a sturdy bottle.
Variations
Cheesy Taco Sticks Variations
Cheesy Taco Sticks shine when I tailor them to a busy, well-stocked pantry and schedule.
Swap fillings with diced chicken, smoky beef, or hearty veggie crumbles for exciting, kid-friendly twists.
Finish with a squeeze of lime, a drizzle of hot sauce, or a crown of fresh cilantro.
Cheese, Protein, and Spice Tweaks
Cheese choices change the mood: sharp cheddar, pepper jack, Monterey Jack, or a dreamy, melty blend.
Elevate flavor with cumin, chili powder, smoked paprika, and a hint of garlic powder.
Top with chopped cilantro or green onions to brighten every single bite and linger.
Vegetarian or Health-Conscious Adaptations
Vegetarian options shine: mushroom, black bean, or lentil fillings work beautifully in this crust.
Try whole-wheat dough or lighter cheese to shave calories without sacrificing chew.
Keep the same crisp crust and kid-friendly texture your family loves, with room to tweak.
Serving Suggestions
Dipping Duo Ideas for Cheesy Taco Sticks
I love pairing these Cheesy Taco Sticks with two quick dip ideas for crowd-pleasing bites.
- Salsa and Sour Cream — classic, cool, and creamy in every bite.
- Guacamole and Pico de Gallo — fresh, zippy, and bright on the palate.
Plating and Presentation Tips
- Arrange on a long platter with a central dip bowl.
- Fan sticks or lay in neat rows for easy grabbing.
- Garnish with chopped cilantro and a light lime squeeze.
- Keep warm cues with a small warming tray or low oven.
Cheesy Taco Sticks: Make-Ahead Tips
Make-Ahead Prep for Cheesy Taco Sticks
When time is tight, I prep Cheesy Taco Sticks in stages.
I assemble the filling and keep dough cold for easy handling.
Chilled dough seals edges better, even after a busy day.
Roll the dough into strips ahead of time.
Freeze filled sticks on a sheet for quick prep later.
Seal edges well so the cheese stays put.
Freezing and Reheating Cheesy Taco Sticks
Freeze unbaked Cheesy Taco Sticks on a sheet until solid.
Transfer to a labeled freezer bag; keep up to 3 months.
Bake from frozen, add 3–5 minutes to the bake time.
If you bake ahead, reheat on a sheet until warm and crisp.
Avoid microwaving; it can sog the crust and ruin texture.
Cheese should melt and edges stay golden.
Make-Ahead Dips and Accompaniments
Dips you plan ahead keep the party flowing for Cheesy Taco Sticks.
Salsa can be made ahead and chilled.
Guacamole browns; whisk in lime to slow it for Cheesy Taco Sticks.
If crowds are big, pre-portion dips into small containers for party sharing.
Label, chill, and rotate with party pace.
Serve with sticks and cilantro.
Worry less about timing and more about flavor harmony for a crowd-worthy bite today.
Keep a small tasting spoon handy for quick adjustments at service.
A fresh squeeze of lemon or lime brightens everything for any party size.
FAQs
FAQ 1: Can I Freeze Cheesy Taco Sticks Before or After Baking?
Yes. You can freeze Cheesy Taco Sticks before or after baking. They hold up well and save busy nights.
For best texture, freeze unbaked sticks on a sheet, then bag them. Bake from frozen; add 3 to 5 minutes.
FAQ 2: What Cheese Variations Work Best with Cheesy Taco Sticks?
Cheddar or Mexican blend is a reliable default. They melt well and stay flavorful.
Pepper Jack adds warmth without sacrificing melt. Monterey Jack yields a creamy, smooth bite. Try a 50/50 blend for balance.
For dairy-free versions, choose vegan cheeses that melt well.
FAQ 3: Can I Bake These in an Air Fryer or Instapot?
Yes, you can bake Cheesy Taco Sticks in an air fryer. Preheat the air fryer to 400°F (205°C) and line with parchment.
Place sticks in a single layer; avoid crowding. Cook for 8 to 12 minutes, until golden and cheese bubbles. Do this in batches for even browning. Instapot isn’t ideal for baked snacks like this; use air fryer or oven. The air fryer often yields crisper crust with less oil.
FAQ 4: How Do I Keep the Edges Sealed so Filling Doesn’t Leak?
Keep edges sealed by brushing water on the dough edge. Fold and pinch firmly; press with a fork for security.
Chill the filled sticks for 10 minutes to set. Seal again if needed, then bake.
Keep filling moderate to avoid leaks. If edges puff apart, reseal with a dab of water.
FAQ 5: What Dips Pair Perfectly with Cheesy Taco Sticks?
Dips are the stars with Cheesy Taco Sticks. Try salsa with sour cream for classic balance.
Guacamole with pico de gallo adds brightness. Add a zesty chipotle mayo for extra kick.
Offer warm dip and cool dip for contrast. Present in labeled bowls so guests grab confidently.
Final Thoughts
The Joy of Easy, Flavor-Packed Snacking
Cheesy Taco Sticks make weeknights feel doable, not chaotic. I love how they blend familiar taco flavors with a kid-friendly, grab-and-go format. They travel from stove to table in minutes, saving me precious time.
The scent alone cheers me up after a long day. A tray of these golden sticks makes dinner feel like a celebration. And they reheat well, turning leftovers into easy lunches.
Encouragement to Make It Your Own
Most important, Cheesy Taco Sticks invite you to make them your own. Experiment with fillings, cheeses, and sauces to fit your family’s tastes. I’d love to hear your twists and see how you conquer busy nights.
Print
Cheesy Taco Sticks Are 5 Irresistible Crispy Savory Bites.
- Total Time: 30 minutes
- Yield: 10 sticks 1x
- Diet: Low Fat
Description
Cheesy Taco Sticks are crispy, savory bites featuring taco-seasoned beef and melted cheese tucked inside a golden crust.
Ingredients
- 1 lb ground beef
- 1 tbsp olive oil
- 1 packet taco seasoning
- ½ cup water
- 1½ cups shredded cheddar or Mexican blend cheese
- 1 tube refrigerated pizza dough
- 2 tbsp melted butter
- ½ tsp garlic powder
- ½ tsp dried parsley
Instructions
- Preheat oven to 400°F (205°C) and line a baking sheet with parchment paper.
- Heat olive oil in a skillet over medium heat. Add ground beef and cook until browned, breaking it apart as it cooks. Drain excess fat if needed.
- Stir in taco seasoning and water. Simmer for 3–4 minutes until thickened. Remove from heat and let cool slightly.
- Roll out pizza dough into a rectangle and cut into 10 equal strips.
- Spoon seasoned beef down the center of each strip and top with shredded cheese.
- Fold dough over the filling and pinch edges to seal, forming sticks.
- Place sticks seam-side down on the prepared baking sheet.
- Brush with melted butter and sprinkle with garlic powder and parsley.
- Bake for 12–15 minutes, or until golden brown and crispy.
- Let cool slightly before serving.
Notes
- For best results, refrigerate the dough while you prepare the filling to help keep the edges sealed.
- Serve with salsa, sour cream, or guacamole for dipping.
- To make ahead, assemble sticks and freeze before baking; bake from frozen, adding a few extra minutes.
- Swap in pepper jack or Monterey Jack for a different cheese kick.
- Prep Time: 15 minutes
- Cook Time: 15 minutes
- Category: Appetizers
- Method: Baking
- Cuisine: American
Nutrition
- Serving Size: 1 stick
- Calories: 320
- Sugar: 2 g
- Sodium: 580 mg
- Fat: 22 g
- Saturated Fat: 9 g
- Unsaturated Fat: 13 g
- Trans Fat: 0 g
- Carbohydrates: 25 g
- Fiber: 1 g
- Protein: 18 g
- Cholesterol: 70 mg
Keywords: Cheesy Taco Sticks, taco bites, cheesy appetizers, snack ideas