
Chocolate Covered Caramel Apple Slices are my answer to busy days and big cravings: a chef’s quick, show-stopping dessert that fits a hectic schedule, travels well to potlucks, and still feels celebratory. I designed these bite-size treats to bridge professional life and social gatherings without sacrificing flavor or presentation. Each slice delivers crisp apple, gooey caramel, and glossy chocolate in one neat, party-ready bite. As a chef, I know timing is everything, so this recipe emphasizes quick prep, steady setting times, and simple toppings for visual appeal. Read on to discover how to pull these off with minimal fuss and maximum wow. Chocolate Covered Caramel Apple Slices are easier than you think, and they’re worth it.
Table of Contents
What makes Chocolate Covered Caramel Apple Slices special
Chocolate Covered Caramel Apple Slices are my answer to busy days. I love how crisp apples meet gooey caramel and glossy chocolate in one bite. They’re bite-sized, party-ready, and easy to scramble into a busy schedule. They travel well to potlucks and look festive on a tray. Best of all, the recipe stays simple, with room for a personal touch.
The bite-sized magic of this combo
Crisp apples, gooey caramel, and a silky chocolate shell meet in tiny bites. It’s texture heaven you can grab with one hand.
A chef-friendly approach for busy schedules
I designed this for real life—fast prep, easy cleanup, and smart make-ahead options. Keep it simple with store-bought caramel and a quick chocolate melt, then top for wow.
Why You’ll Love This Chocolate Covered Caramel Apple Slices
Chocolate Covered Caramel Apple Slices are my quick, crowd-pleasing answer to busy days. They taste like a celebration in a bite—crisp apple, gooey caramel, and a glossy chocolate shell—without heavy prep or mess. I love how easy they are to assemble, from weeknights to weekend potlucks.
Effortless assembly for time-strapped days
I slice apples and prep caramel, then set up a simple dipping line. With parchment and a quick chill between coats, I keep the workflow smooth and fast.
Crowd-pleasing visuals with minimal effort
I finish with a light sprinkle of toppings and arrange on a neat tray. The glossy finish and colorful decorations earn smiles before anyone bites in.
Ingredients Chocolate Covered Caramel Apple Slices
These ingredients form the base for Chocolate Covered Caramel Apple Slices that shine on any tray. I love how crisp apples meet gooey caramel and a glossy chocolate shell in one bite. Exact quantities are at the bottom of the article and available for printing.
Core components
- 2 large apples (Granny Smith or Honeycrisp work best)
- 1 cup caramel candies, unwrapped
- 1 tablespoon milk
- 1 cup chocolate chips (dark, milk, or semi-sweet)
- 1 tablespoon coconut oil (optional, for glossy coating)
- Toppings: crushed nuts, mini chocolate chips, sprinkles, or crushed cookies
Optional add-ins and substitutions
- Dairy-free: use dairy-free caramel and dairy-free chocolate; skip milk or use almond milk
- Vegan: ensure caramels and chocolate are vegan; use coconut oil if needed
- Gluten-free: most caramels are GF; check labels
- Flavor twists: a pinch of sea salt, cinnamon, or chili powder for heat
- Fruit swaps: pears or thicker apple slices for variety
- Make-ahead tip: substitute store-bought caramel sauce and skip heating
Ingredient tips and sourcing
For best results with Chocolate Covered Caramel Apple Slices, choose crisp apples at the store. I grab Honeycrisp for sweetness and crunch.
Look for smooth caramel candies; unwrapping saves time. Chocolate chips melt evenly and stay glossy.
If you want a shine, add coconut oil to the chocolate; it helps during dipping.
How to Make Chocolate Covered Caramel Apple Slices
Step 1: Prep apples and caramel baseline
First, wash the apples and dry them well. I like Granny Smith or Honeycrisp for crisp bites. Slice into thick rounds or wedges, seeds removed. Pat them dry again so the caramel sticks.
Set up the caramel baseline. Use 1 cup caramel candies and 1 tablespoon milk. Microwave in 20‑second bursts, stirring until smooth. This keeps the caramel glossy and easy to dip.
Line a parchment-lined tray and have a cutting board handy. This keeps the workflow calm and clean. Remember, this base is the heart of Chocolate Covered Caramel Apple Slices.
Step 2: Melt caramel and set up dipping station
Return to your caramel. If it lumps, nudge it another 10 seconds in the microwave. Smooth caramel means even dipping and less mess.
Set up the dipping line: a shallow bowl of warm caramel, a spoon for dripping, a paper towel, and a parchment-lined tray. Easy reach matters here.
Keep caramel warm but stirring often. If it thickens, a quick zap helps. This setup makes dipping feel like a breeze, not a chore.
Step 3: Insert sticks and portion slices for dipping
Insert sticks into the apple slices. Use sturdy sticks so they don’t slip during dipping. Center them for balance and easy handling.
If slices feel too large, trim them to a comfortable bite. You want sturdy, manageable pieces for dipping and eating.
Arrange a few pieces on the board so you can dip without crowding. A calm station saves you time later.
Step 4: Dip in caramel and chill to set
Dip each slice halfway into the caramel. Let the excess drip back into the bowl. Place on the parchment-lined tray.
Chill the caramel-coated slices for about 10 minutes. This sets the base so the chocolate sticks well later.
If caramel stays runny, refrigerate briefly to speed setting. Patience now pays off with a smoother finish.
Step 5: Melt chocolate and prepare coating
Melt chocolate chips with coconut oil if using. Use 20‑ to 30‑second bursts, stirring between mini‑melts. You want a silky, glossy coating.
Keep the chocolate warm enough to coat, but not so hot that it burns. If you prefer, you can use your favorite chips—dark, milk, or semi‑sweet all work well.
Stir until the mixture is smooth and shiny. A glossy shell makes every bite feel special.
Step 6: Dip caramel-coated slices in chocolate
Dip the caramel-coated slices halfway into the melted chocolate. Let the excess drip back into the bowl.
Return them to the parchment-lined tray. The contrast of shiny chocolate against caramel is what makes these bites irresistible.
If you see any thin or patchy spots, gently coax the chocolate with the spoon to even it out. Small touches add up.
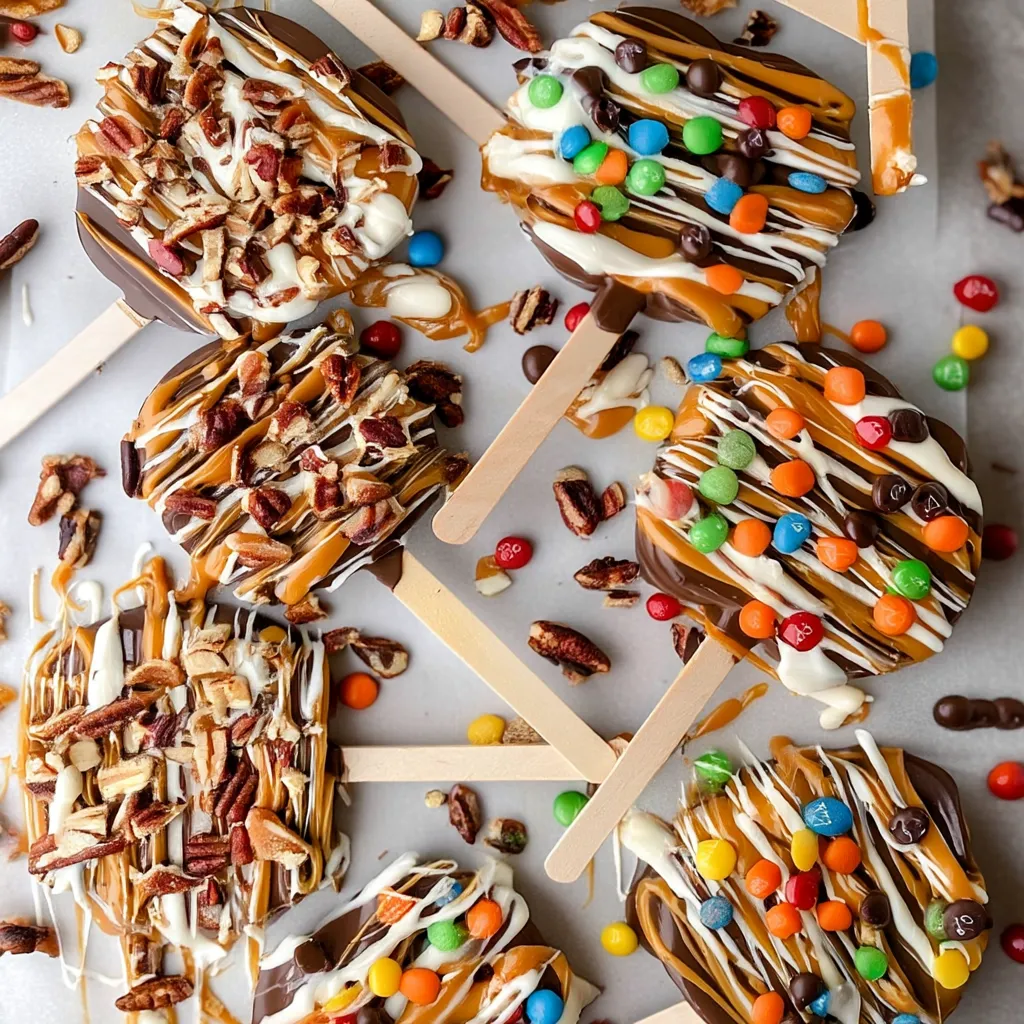
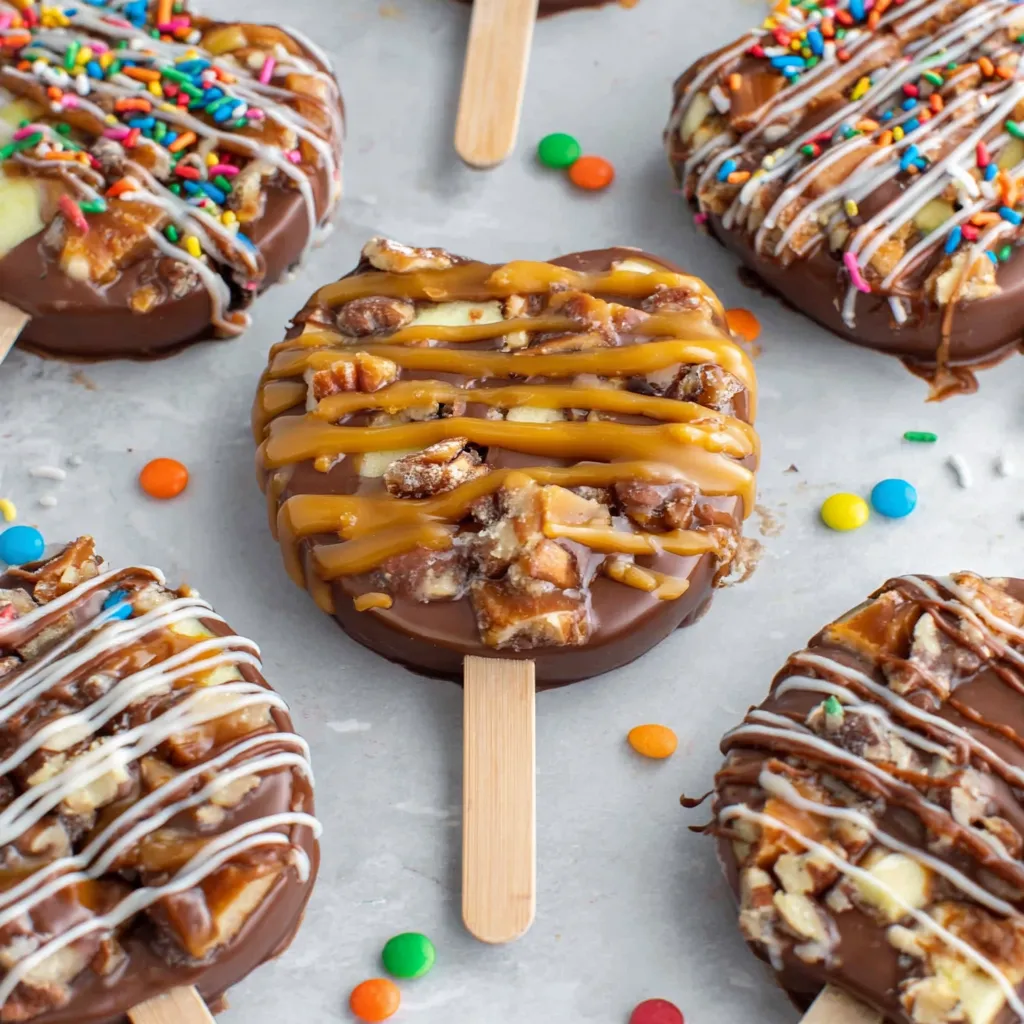
Step 7: Add toppings and final chill
Sprinkle toppings immediately while the chocolate is still wet. Crushed nuts, mini chocolate chips, sprinkles, or crushed cookies add personality.
Chill the tray for 10–15 minutes until the chocolate is firm. The shell will set and shine like a jewel on a tray.
Arrange the finished slices on a clean platter or store them briefly. They’re party-friendly and photo‑worthy.
Step 8: Serve, store, and transport tips
Serve fresh for the best texture, but you can refrigerate for a few hours. Let them come to room temperature before serving for optimal bite.
Store leftovers in an airtight container with parchment between layers. They travel well in a cooler bag for potlucks.
For potlucks, transport on a sturdy tray with parchment to prevent sticking. You’ll feel like a pro in minutes. These bite-sized treats also double as easy party snacks that wow guests.
Tips for Success with Chocolate Covered Caramel Apple Slices
Quick prep and mise en place
I start with quick mise en place.
I wash, dry, slice, and line the apples.
I keep Chocolate Covered Caramel Apple Slices within reach.
Prep ahead when possible; apples stay bright.
I slice and pat dry, then refrigerate briefly if needed.
I have caramel and chocolate ready in separate bowls.
Handling caramel and chocolate for smooth coating
I keep caramel warm but not boiling.
I stir often until smooth and glossy.
If it thickens, I add a splash of milk.
I melt chocolate with coconut oil for shine.
I dip at moderate heat to avoid streaks.
If the coating hardens, I warm briefly and coat again.

Equipment Needed for Chocolate Covered Caramel Apple Slices
Having the right tools for Chocolate Covered Caramel Apple Slices saves time and keeps a busy schedule calm. Here’s a lean setup that works on weeknights and at potlucks.
Must-have tools
- Sharp paring knife and cutting board
- Microwave-safe bowls for caramel and chocolate
- Parchment paper or silicone mat for tray lining
- Small spatula or spoon for stirring
- Popsicle sticks or sturdy skewers
- A shallow dipping bowl or wide dish for easy coating
Practical alternatives and hacks
- Use parchment-lined trays or silicone mats if you don’t have dedicated cooling racks.
- If sticks are scarce, use plastic forks inserted near the edge for a temporary handle.
- Short on time? Use store-bought caramel sauce and skip heating.
- To save cleanup, choose coconut oil only if you want extra shine; otherwise, skip it.
- No candy thermometer? Gauge caramel readiness by smoothness and a gentle pull test rather than temp.
Variations of Chocolate Covered Caramel Apple Slices
Looking for flavor variety in Chocolate Covered Caramel Apple Slices? I love these quick twists that keep dessert exciting. They let me switch up textures and colors without extra prep.
Flavor twists to try
Try coating with crushed toffee, white chocolate, or a sprinkle of sea salt. Add a hint of cinnamon or chili powder to wake the palate. Layer different chocolates for contrast—dark on the bottom, milk on top.
Dietary-friendly adaptations
Dairy-free friends can use coconut milk and dairy-free chocolate. Vegan options work with certified vegan caramels and chocolate. For gluten-free trays, check labels but most caramels are GF. Skip added milk; swap in a splash of dairy-free milk if needed.
Fun topping ideas
Top with chopped nuts, crushed cookies, or colorful sprinkles. Try cinnamon sugar, espresso dust, or shredded coconut for texture. You can mix toppings in bowls to keep things tidy.
Serving Suggestions for Chocolate Covered Caramel Apple Slices
Presentation ideas
I love styling them on a chilled tray, parchment-lined, with a light sprinkle of chopped nuts. Arrange in neat rows, alternating apple colors, and tuck in a few mini picks for easy grabbing.
Keep the shine by placing them on a simple platter with a small bowl of extra melted chocolate for drizzling. A splash of color from sprinkles or edible gold makes the tray pop without extra fuss.
Pairings and party tips
Pair with sparkling cider or hot chocolate, plus a dash of cinnamon on whipped cream. For parties, pack in a box with parchment between layers and label flavors for guests.
Advanced Tips for Chocolate Covered Caramel Apple Slices
Make-ahead and transport
I’ve learned to plan ahead with Chocolate Covered Caramel Apple Slices.
Slice apples, pat dry, caramel warmed, chocolate melted and glossy.
For transport, layer on parchment, stack gently in a sturdy tray.
Freezing and long-term storage
If you need to stretch this dessert beyond today, freezing helps—but do it smart.
Best practice: freeze the dipped slices after the chocolate sets; flash-freeze on a tray first.
Then wrap tightly in parchment and a container; freeze 1–3 months, thaw in fridge.
Flavor layering and texture balance
Flavor layering is where the magic hides.
Think sea salt on chocolate, a pinch of cinnamon, or a hint of chili for heat.
Balance textures by coating lightly, then add toppings for contrast and bite.
FAQs about Chocolate Covered Caramel Apple Slices
Can I use different apples or caramel types?
Yes. You can mix apples, but crisp varieties work best. I prefer Granny Smith or Honeycrisp for staying firm when dipped. My Chocolate Covered Caramel Apple Slices are easy party snacks.
If caramel seems stiff, warm gently; if too loose, cool briefly. Balance flavor by choosing smooth caramel and a glossy chocolate finish. Remember, prep can be flexible; keep it simple and tasty.
How long do these stay fresh?
I usually enjoy them best the same day for peak texture. I keep leftovers in the fridge for up to two days. I’ve found letting flavors settle a bit helps before serving.
Bring slices to room temperature to regain snap. Store in an airtight container with parchment between layers. I’ll often freeze, but the texture changes slightly.
Can I make them dairy-free or gluten-free?
Yes, I swap in dairy-free caramel and dairy-free chocolate. Most caramels are gluten-free, but I check labels. My notes cover dairy-free and gluten-free variations here.
I use coconut oil to help shine and smooth coating. Alternative: swap dairy-free milk for a splash if needed. Read the full tips in the article for specifics.
What dipping setup works best for beginners?
I recommend a simple dipping line to start. Use a shallow bowl of warm caramel and melted chocolate close at hand. Keep parchment ready and a tray nearby for quick place-and-dry.
I’ll also line up toppings within reach so dipping stays smooth. I practice with a few slices before the batch. With a calm setup, beginners feel like pros.
How do I prevent the chocolate from cracking?
I keep coating even and avoid quick temperature shifts. I choose coconut oil for shine and a smoother texture. I let chocolate set fully before moving slices.
I handle the dipped pieces gently to prevent cracking. I crack the shell by rushing, so I don’t. Patience pays off with a glossy, firm finish.
Final Thoughts on Chocolate Covered Caramel Apple Slices
Celebrating simple, elegant treats
These Chocolate Covered Caramel Apple Slices feel like a tiny celebration in my hand. They brighten busy weeks and spark smiles at potlucks. Crisp apples meet gooey caramel and glossy chocolate in one bite.
I love that simple ingredients can look fancy. With smart steps and toppings, you serve dessert that feels thoughtful, not fussy.
Encouragement to customize and share
Make them your own by swapping apples, chocolate, or toppings. A pinch of sea salt, cinnamon, or espresso dust adds personality.
Share a tray with neighbors, teachers, or teammates. These slices travel well, fit into busy schedules, and say you care without saying a word.
Print
Chocolate Covered Caramel Apple Slices 5 hot new yum bites.
- Total Time: 45 minutes
- Yield: 10–12 slices 1x
- Diet: Vegetarian
Description
Chocolate Covered Caramel Apple Slices: Crisp apples layered with gooey caramel and rich chocolate for bite-sized, party-friendly treats.
Ingredients
- 2 large apples (Granny Smith or Honeycrisp work best)
- 1 cup caramel candies (or homemade caramel)
- 1 tbsp milk
- 1 cup chocolate chips (dark, milk, or semi-sweet)
- 1 tbsp coconut oil (optional, for smoother chocolate)
- Toppings: crushed nuts, mini chocolate chips, sprinkles, or crushed cookies
Instructions
- Slice apples into thick rounds or wedges, removing any seeds. Pat dry with a paper towel.
- Melt caramel with milk in a microwave-safe bowl, stirring until smooth.
- Insert popsicle sticks or skewers into apple slices for easy dipping.
- Dip each slice halfway into caramel, then place on a parchment-lined tray. Chill 10 minutes to set.
- Melt chocolate with coconut oil until smooth. Dip caramel-coated slices halfway into chocolate.
- Immediately sprinkle with your choice of toppings.
- Chill another 10–15 minutes until firm. Enjoy fresh!
Notes
- For extra smooth caramel, heat in short 20-second bursts and stir between intervals.
- Use parchment-lined trays to prevent sticking.
- If using store-bought caramel, microwave in short intervals until smooth.
- Refrigerate briefly to speed setting if needed.
- Insert sticks toward the center of the slices to avoid breaking the apple.
- Best served the same day for optimal texture.
- Prep Time: 20 minutes
- Cook Time: 0 minutes
- Category: Dessert
- Method: Dip and chill
- Cuisine: American
Nutrition
- Serving Size: 1 slice (of 10–12 slices)
- Calories: approx. 190
- Sugar: 22 g
- Sodium: 15 mg
- Fat: 9 g
- Saturated Fat: 5 g
- Unsaturated Fat: 3 g
- Trans Fat: 0 g
- Carbohydrates: 28 g
- Fiber: 2 g
- Protein: 2 g
- Cholesterol: 5 mg
Keywords: Chocolate Covered Caramel Apple Slices, caramel apples, chocolate apple bites, chocolate dipped apples, caramel apple slices, easy party snacks, no-bake dessert bites