
Walking Taco Nachos bring the fun of a backyard snack straight to your campsite, combining crunchy tortilla chips with seasoned smoked beef and melty cheese for a handheld feast. This easy, fire‑ready recipe lets you layer flavors in foil, melt the cheese, then finish with fresh tomatoes, lettuce, sour cream and salsa for a burst of texture. Perfect for families, friends, or a solo adventure, these nachos pack bold taco seasoning and simple prep into a portable, crowd‑pleasing dish. When the cheese turns golden and the aroma of smoked beef drifts around, you’ll know it’s time to dig in and enjoy!!
Table of Contents
Why You’ll Love This Walking Taco Nachos
There is something inherently satisfying about the combination of crunchy chips, gooey cheese, and savory smoked beef. The dish captures the spirit of a classic taco but presents it in a portable, hand‑held format that works perfectly around a campfire or at a backyard barbecue. The flavors are bold yet familiar, making it a crowd‑pleaser for both kids and adults.
Another reason these nachos shine is their speed. From start to finish the recipe takes less than half an hour, meaning you can spend more time enjoying the outdoors and less time in the kitchen. The foil‑pouch method also keeps the mess contained, so clean‑up is a breeze. Finally, the recipe is flexible—you can adjust the heat level, swap toppings, or even double the batch for larger gatherings without losing the core appeal.
Equipment You’ll Need
While the ingredient list is short, having the right tools makes the process smoother and ensures the best texture.
- Heavy‑duty aluminum foil (large sheets for creating pouches)
- Cast‑iron skillet or a grill‑safe pan for cooking the smoked beef
- Spatula for stirring the seasoned meat
- Sharp knife for dicing tomatoes and shredding lettuce
- Measuring cups and spoons for seasoning
- Serving platter or a large cutting board for assembling the finished nachos
All of these items are typically available at a campsite or can be packed in a small cooler bag for convenience.
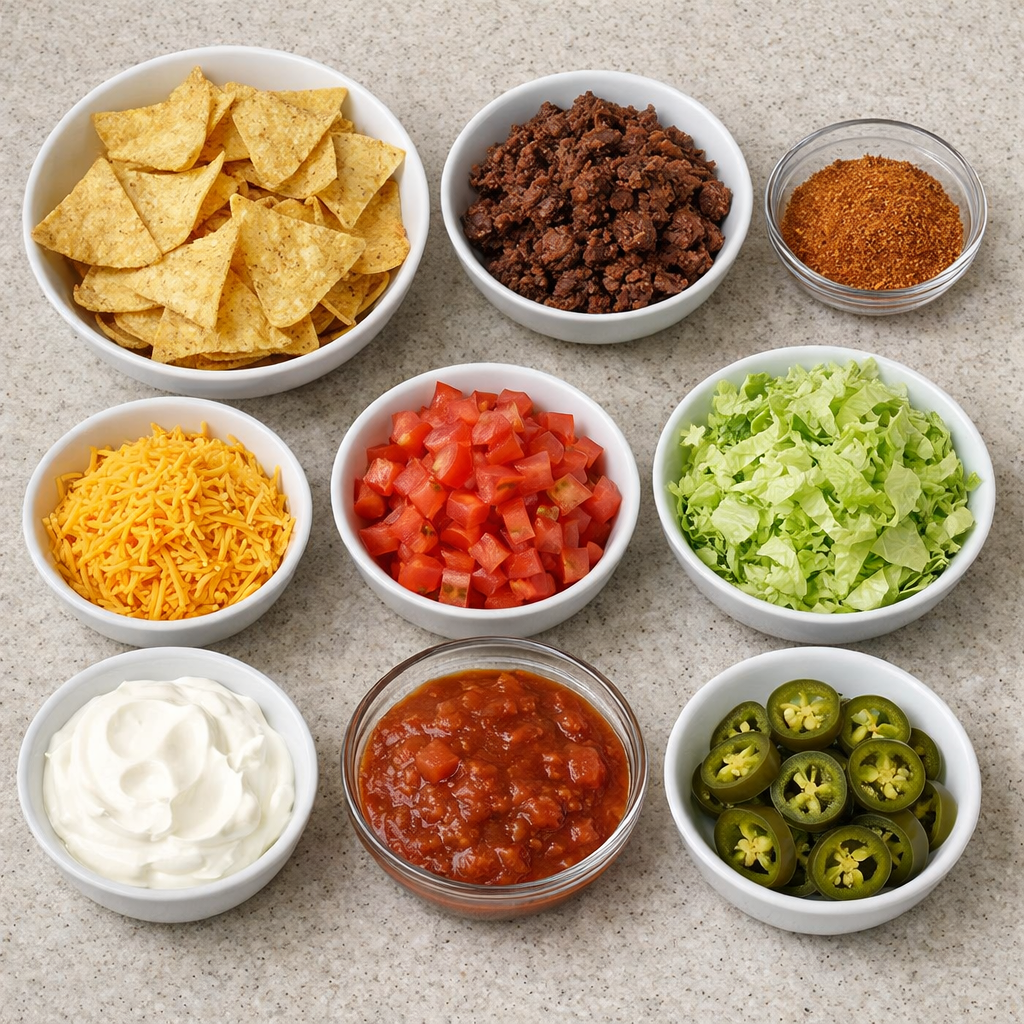
Ingredients for Walking Taco Nachos
Below is the complete list of ingredients you will need to create the perfect batch of Walking Taco Nachos. Each component has been selected for flavor balance and ease of preparation in an outdoor setting.
- 2 cups tortilla chips (preferably sturdy, thick‑cut)
- 1 lb smoked beef, cooked and crumbled
- 1 packet taco seasoning (or homemade blend)
- 1 cup shredded cheese (cheddar, Monterey Jack, or a blend)
- 1 cup diced tomatoes, seeded
- 1 cup shredded lettuce
- ½ cup sour cream
- ½ cup salsa
- Sliced jalapeños (optional, for added heat)
Ingredient Substitutions
If you need to adapt the recipe, consider these simple swaps that keep the flavor profile intact while accommodating what you have on hand. Use a different cheese such as pepper jack for extra spice, or replace the salsa with a fresh pico de gallo for a brighter taste. The smoked beef can be pre‑cooked and stored in a cooler, making it even quicker to assemble on site.
How to Make Walking Taco Nachos (Step‑By‑Step)
Step 1: Prepare the Fire or Grill
Start by lighting a campfire or pre‑heating a grill to medium heat. You want a steady, moderate temperature that will melt cheese without scorching the chips. If using a grill, arrange the burners so there is an even heat zone for the foil pouch.
Step 2: Cook the Smoked Beef
Place a skillet on the heat source and add the crumbled smoked beef. Sprinkle the taco seasoning over the meat, stirring to coat evenly. Cook for 3‑4 minutes, allowing the flavors to meld and the beef to heat through. Remove from heat once aromatic and set aside.
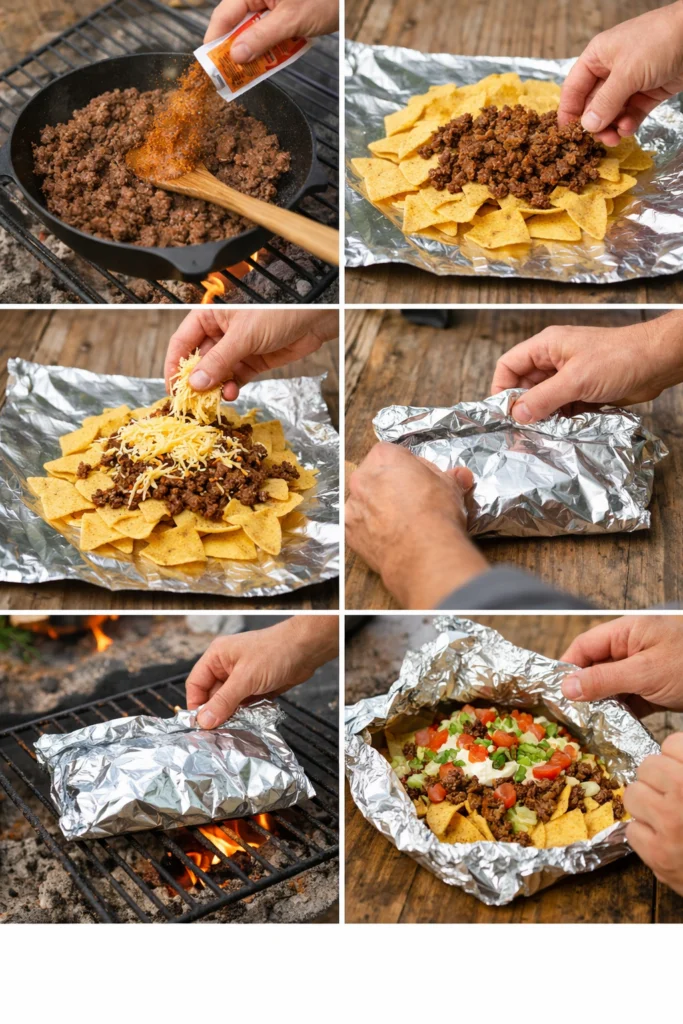
Step 3: Assemble the Foil Pouch
Lay a large sheet of aluminum foil on a flat surface. Spread a layer of tortilla chips across the foil, then sprinkle the seasoned smoked beef evenly over the chips. Top the meat with a generous handful of shredded cheese, ensuring coverage for a melt‑through effect.
Step 4: Melt the Cheese
Fold the foil edges over the top to create a sealed pouch, leaving a small vent for steam to escape. Place the pouch directly on the grill grates or over the campfire’s coals. Cook for 5‑10 minutes, checking that the cheese has fully melted and the chips are slightly toasted.
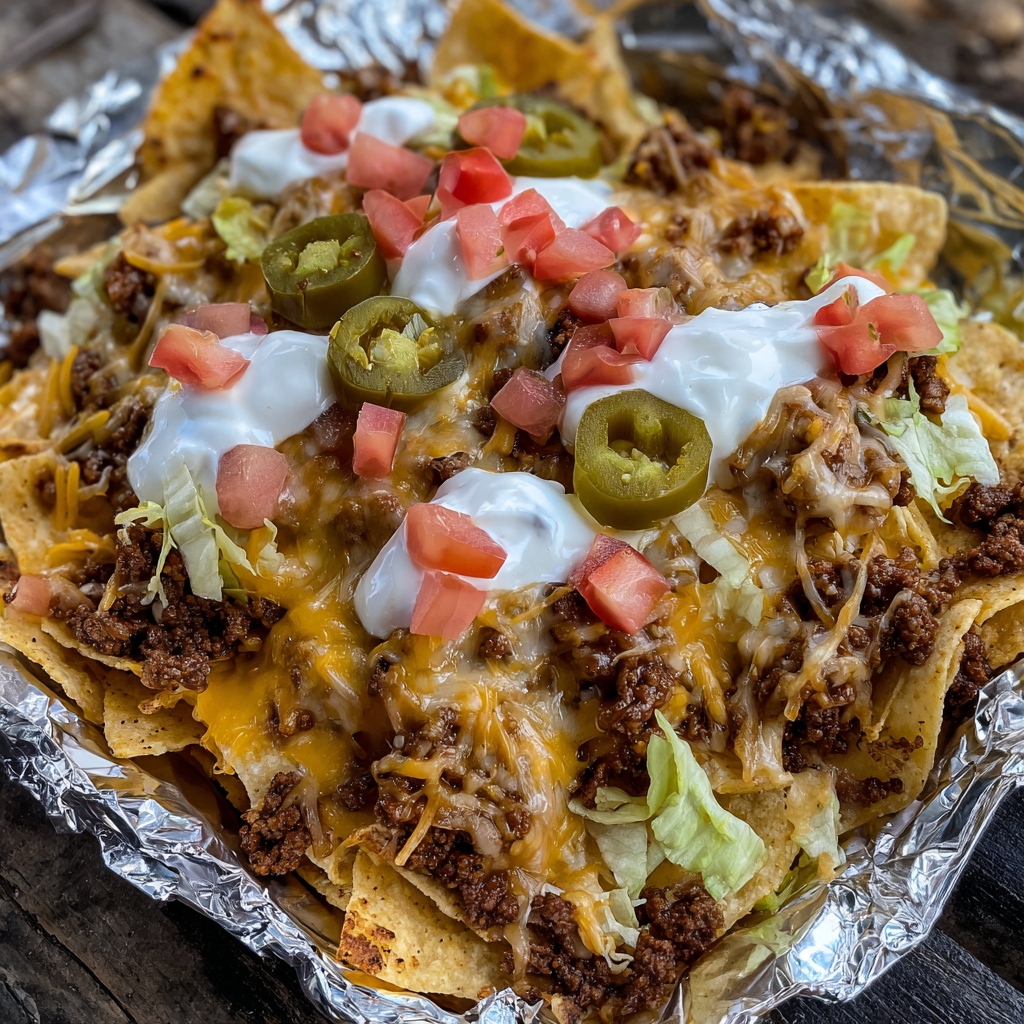
Step 5: Add Fresh Toppings
Carefully open the foil pouch, allowing any hot steam to escape safely. Transfer the nacho mixture to a serving platter or keep it in the foil for a rustic presentation. Sprinkle diced tomatoes, shredded lettuce, and sliced jalapeños on top. Dollop sour cream and salsa around the edges for guests to add as they like.
Step 6: Serve and Enjoy
Serve the Walking Taco Nachos immediately while the cheese is still gooey and the chips are crisp. Encourage diners to mix the fresh toppings into each bite for a perfect balance of heat, creaminess, and crunch.
Variations and Twists
One of the strengths of this recipe is its adaptability. Here are a few ideas to keep things exciting:
- Spicy Version: Add sliced beef chorizo to the meat layer or incorporate a dash of hot sauce into the salsa.
- Cheese Blend: Mix cheddar with pepper jack or mozzarella for a richer melt.
- Vegetable Boost: Include corn kernels, black beans, or roasted red peppers for added texture.
- Breakfast Twist: Top with scrambled eggs and a drizzle of hot sauce for a morning-friendly version.
What to Serve With Walking Taco Nachos
Pairing the nachos with complementary sides enhances the overall meal experience. Consider these options:
- Grilled corn on the cob with a brush of butter and a sprinkle of smoked paprika.
- Fresh fruit salad featuring watermelon, pineapple, and a squeeze of lime.
- Cold beverages such as sparkling grape juice or a chilled lemonade.
- Simple side salad with vinaigrette for a refreshing contrast.
Pro Tips for Perfect Results
- Use sturdy tortilla chips to prevent them from becoming soggy when layered with cheese.
- Pre‑cook the smoked beef at home and store it in a sealed container; this reduces on‑site cooking time.
- Don’t over‑fill the foil pouch; a thin, even layer ensures even melting.
- Allow the pouch to rest for a minute after removing from heat; this helps the cheese set slightly for easier serving.
- Experiment with cheese placement—scatter some on top and some underneath the meat for a double‑melt effect.
Common Mistakes to Avoid
- Using flimsy chips that dissolve into the cheese—choose thick‑cut chips.
- Cooking the foil pouch too close to direct flame, which can burn the cheese.
- Skipping the vent in the foil; steam needs an escape route to keep the chips crisp.
- Adding too many fresh toppings before melting—wait until after the cheese is melted for optimal texture.
- Neglecting to season the smoked beef adequately; the taco seasoning is essential for flavor.
Storage, Reheating & Make‑Ahead Tips
If you need to prepare ahead of time, follow these guidelines:
- Store cooked smoked beef in an airtight container in the cooler for up to 2 days.
- Keep tortilla chips and shredded cheese separate to maintain crunch.
- Assemble the foil pouch without cheese, refrigerate, and add cheese just before cooking.
- Reheat leftover nachos in a skillet over medium heat, covering briefly to melt the cheese.
- For long‑term storage, freeze the cooked smoked beef in zip‑top bags; thaw before use.
Frequently Asked Questions
Can I use a different type of meat? Yes, ground beef or turkey work, but smoked beef gives the signature flavor.
What if I don’t have a grill? A portable propane stove with a skillet works well; just place the foil pouch on a heat‑proof surface.
How long can the assembled nachos sit before serving? Aim to serve within 15 minutes of melting the cheese for optimal texture.
Is it possible to make this recipe gluten‑free? Use corn‑based tortilla chips and ensure any taco seasoning is free of wheat additives.

Conclusion
Walking Taco Nachos deliver bold flavor, effortless preparation, and a fun, handheld experience that fits perfectly into any outdoor adventure or casual gathering. By following the steps, tips, and variations outlined above, you’ll be able to serve a crowd‑pleasing snack that keeps everyone smiling and coming back for seconds.
Print
Walking Taco Nachos: Easy Campfire Snack for Outdoor Gatherings and Parties
- Total Time: 25 minutes
- Yield: 4 servings
- Diet: Standard
Description
Walking Taco Nachos are the ultimate campfire snack, layering crunchy tortilla chips with seasoned smoked beef, melted cheese, and vibrant fresh toppings. This easy, 4‑serving recipe guides you to melt cheese in foil over a grill, then top with tomatoes, lettuce, sour cream, salsa, and optional jalapeños for a burst of flavor. Perfect for backyard parties or outdoor adventures, these nachos deliver bold taco seasoning and satisfying crunch in minutes. Serve hot with extra salsa and cool sour cre
Ingredients
- Tortilla chips
- smoked beef
- taco seasoning
- shredded cheese
- diced tomatoes
- shredded lettuce
- sour cream
- salsa
- sliced jalapeños (optional)
Instructions
- Light a campfire or preheat grill to medium.
- Cook smoked beef with taco seasoning in a skillet until heated through.
- On a sheet of foil, layer chips, beef, and cheese.
- Fold foil into a pouch and place over heat until cheese melts.
- Open pouch and top with tomatoes, lettuce, sour cream, salsa, and jalapeños if desired.
- Serve immediately.
Notes
- For extra flavor
- add a pinch of smoked paprika to the beef. Keep toppings separate until serving to maintain crunch.
- Prep Time: 10 minutes
- Cook Time: 15 minutes
- Category: Snack
- Method: Grilling
- Cuisine: American
Nutrition
- Serving Size: 1 serving
- Calories: 450
- Sugar: 5g
- Sodium: 700mg
- Fat: 25g
- Saturated Fat: 10g
- Unsaturated Fat: 12g
- Trans Fat: 0g
- Carbohydrates: 35g
- Fiber: 3g
- Protein: 20g
- Cholesterol: 80mg
Keywords: Walking Taco Nachos, easy campfire nachos, taco nachos recipe, smoked beef nachos, outdoor snack ideas, quick nachos recipe, camping food recipes, grill nachos, foil nachos, party snack ideas, how to make nachos